Building a Drop-in Audio App With SwiftUI and Vapor - Part 2
Introduction
The first part of this tutorial used the Conversation API to create a server for a drop-in audio app. The server supports creating new users, creating new chat rooms, and listing all the open chat rooms. In this tutorial, you will build an iOS application that uses the Vonage Client SDK to consume and start chatting. If you like to jump straight into this tutorial, you can follow the instructions in the GitHub repository for the server to get everything set up.
Prerequisites
Additionally, from the first part's prerequisites, you will need Cocoapods to install the Vonage Client SDK for iOS.
Creating the iOS Application
Time to get the iOS application set up. Once it is created, you will install the Client SDK and ask for microphone permissions.
Create an Xcode Project
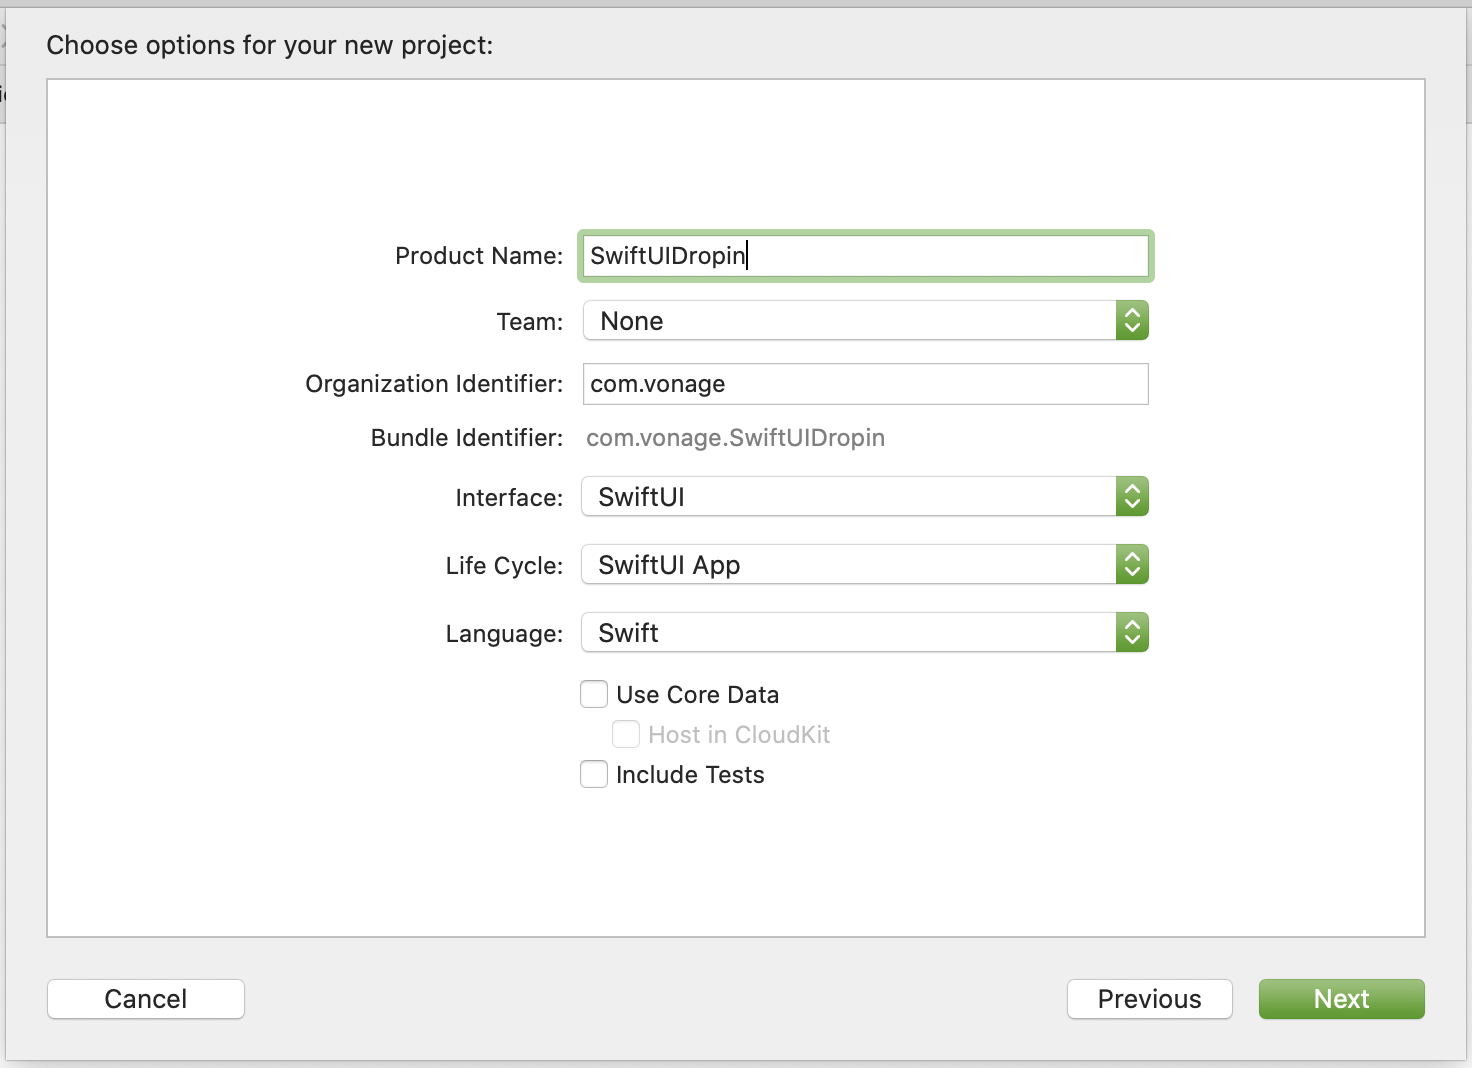
To get started, open Xcode and create a new project by going to File > New > Project. Select an App template and give it a name. Select SwiftUI for the interface, SwiftUI App for the life cycle, and Swift for the language. Finally, a location to save your project.

Install the Client SDK
Now that you've created the project, you can add the Vonage Client SDK as a dependency. Navigate to the location where you saved the project in your terminal and run the following commands.
- Run the
pod initcommand to create a new Podfile for your project. - Open the Podfile in Xcode using
open -a Xcode Podfile. - Update the Podfile to have
NexmoClientas a dependency.
# Uncomment the next line to define a global platform for your project
# platform :ios, '9.0'

target 'SwiftUIDropin' do
  # Comment the next line if you don't want to use dynamic frameworks
  use_frameworks!

  # Pods for SwiftUIDropin
  pod 'NexmoClient'
end
- Install the SDK using
pod install. - Open the new xcworkspace file in Xcode using
open SwiftUIDropin.xcworkspace.
Microphone Permissions
Since the application will be using the microphone to place calls, you need to ask for permission to do so explicitly.
The first step is to edit the Info.plist file. The Info.plist is a file that contains all the metadata required for the application. Add a new entry to the file by hovering your mouse over the last entry in the list and click the little + button that appears. From the dropdown list, pick Privacy - Microphone Usage Description and add Microphone access required to take part in audio rooms for its value.
You will do the second step for requesting microphone permissions later on in the tutorial.
Create the Login Screen
The Client SDK needs a JWT to connect to the Vonage servers. The iOS application needs to send a username to the /auth endpoint of the server. Create a new file called Models.swift by going to File > New > File (CMD + N). Similar to the backend, there is a struct for the request's body and a struct for server response.\
Add the following structs to the Models.swift file:
struct Auth: Codable {
    struct Body: Codable {
        let name: String
    }

    struct Response: Codable {
        let name: String
        let jwt: String
    }
}
Since the iOS application will use three different endpoints, you will create a small class to reuse the networking code. Create a new file called RemoteLoader.swift and add the following class:
import Foundation

final class RemoteLoader {
    enum RemoteLoaderError: Error {
        case url
        case data
    }

    static func load<T: Codable, U: Codable>(urlString: String, body: T?, responseType: U.Type, completion: @escaping ((Result<U, RemoteLoaderError>) -> Void)) {
        guard let url = URL(string: urlString) else {
            completion(.failure(.url))
            return
        }

        var request = URLRequest(url: url)

        if let body = body, let encodedBody = try? JSONEncoder().encode(body) {
            request.httpMethod = "POST"
            request.httpBody = encodedBody
            request.setValue("application/json", forHTTPHeaderField: "Content-Type")
        }

        URLSession.shared.dataTask(with: request) { data, response, error in
            if let data = data {
                if let response = try? JSONDecoder().decode(U.self, from: data) {
                    completion(.success(response))
                    return
                }
            }
            completion(.failure(.data))
        }.resume()
    }
}
The RemoteLoader class consists of an error enum and a static load function. The load function is generic over two types, T and U, which conform to the Codeable protocol.\
T represents the struct that will be used as the body of a request that this function sends. It is optional as some requests may not require a body. U represents the type of response struct.\
When making a network request, you supply the URL, body, and response type, and the load function returns a result.
Before you start building the user interface (UI) for the app, you will build a model class first. This class is used to separate the logic of the app from the view code. In this case, the model class will handle the Client SDK delegate calls and make the login network request.\
At the top of the ContentView.swift file, import the Client SDK and AVFoundation:
import SwiftUI
import NexmoClient
import AVFoundation
Then at the bottom of the file, create a new class called AuthModel.
final class AuthModel: NSObject, ObservableObject, NXMClientDelegate {

}
Within this class, define the properties needed:
final class AuthModel: NSObject, ObservableObject, NXMClientDelegate {
    @Published var loading = false
    @Published var connected = false

    var name = ""

    private let audioSession = AVAudioSession.sharedInstance()
}
The @Published property wrapper is how the UI will know when to react to changes from the model class; this is all handled for you as the class conforms to the ObservedObject protocol.\
The audioSession property is used to request the microphone permissions. To complete requesting microphone permissions for the app, add the following function to the AuthModel class:
func requestPermissionsIfNeeded() {
    if audioSession.recordPermission != .granted {
        audioSession.requestRecordPermission { (isGranted) in
            print("Microphone permissions \(isGranted)")
        }
    }
}
This function will first check if the permissions have already been granted; if not, it will request them and print the outcome to the console.\
Next, you can add the function that makes the request to the backend server using the RemoteLoader class:
func login() {
    loading = true

    RemoteLoader.load(urlString: "https://URL.ngrok.io/auth", body: Auth.Body(name: self.name), responseType: Auth.Response.self) { result in
        switch result {
        case .success(let response):
            DispatchQueue.main.async {
                NXMClient.shared.setDelegate(self)
                NXMClient.shared.login(withAuthToken: response.jwt)
            }
        default:
            break
        }
    }
}
Replace the urlString string with your ngrok URL. Once the response is received, the function will use the JWT to log in to the Client SDK and set the SDK's delegate to this class.\
In a production environment, you would want to have the server also pass along information about the TTL of the JWT and perform further checks in the application about the validity of the JWT before performing actions that require the Client SDK.
The NXMClientDelegate is how the Client SDK communicates changes with the Vonage servers back to your application. Next, implement the required delegate functions in the AuthModel class:
func client(_ client: NXMClient, didChange status: NXMConnectionStatus, reason: NXMConnectionStatusReason) {
    switch status {
    case .connected:
        self.connected = true
        self.loading = false
    default:
        self.connected = false
        self.loading = false
    }
}

func client(_ client: NXMClient, didReceiveError error: Error) {
    self.loading = false
    self.connected = false
}
When there is a change in the SDK's status or an error, the booleans connected and loading will change, which will cause changes to the UI. The final function that you need to add to the AuthModel calls requestPermissionsIfNeeded:
func setup() {
    requestPermissionsIfNeeded()
}
With the model class complete, you can now create the UI. Update the ContentView struct:
struct ContentView: View {
    @ObservedObject var authModel = AuthModel()

    var body: some View {
        NavigationView {
            VStack {
                if authModel.loading {
                    ProgressView()
                    Text("Loading").padding(20)
                } else {
                    TextField("Name", text: $authModel.name)
                        .textFieldStyle(RoundedBorderTextFieldStyle())
                        .multilineTextAlignment(.center)
                        .padding(20)
                    Button("Log in") {
                        authModel.login()
                    }
                    NavigationLink("", destination: RoomListView(),
                                   isActive: $authModel.connected).hidden()

                }
            }.navigationTitle("VonageHouse 👋")
            .navigationBarBackButtonHidden(true)
        }.onAppear(perform: authModel.setup)
    }
}
The ContentView struct has an instance of the AuthModel class. The loading property of the authModel will determine if the ContentView renders a loading state or the input view, which has a Textfield for a username to be entered and a button that triggers the login function from earlier.
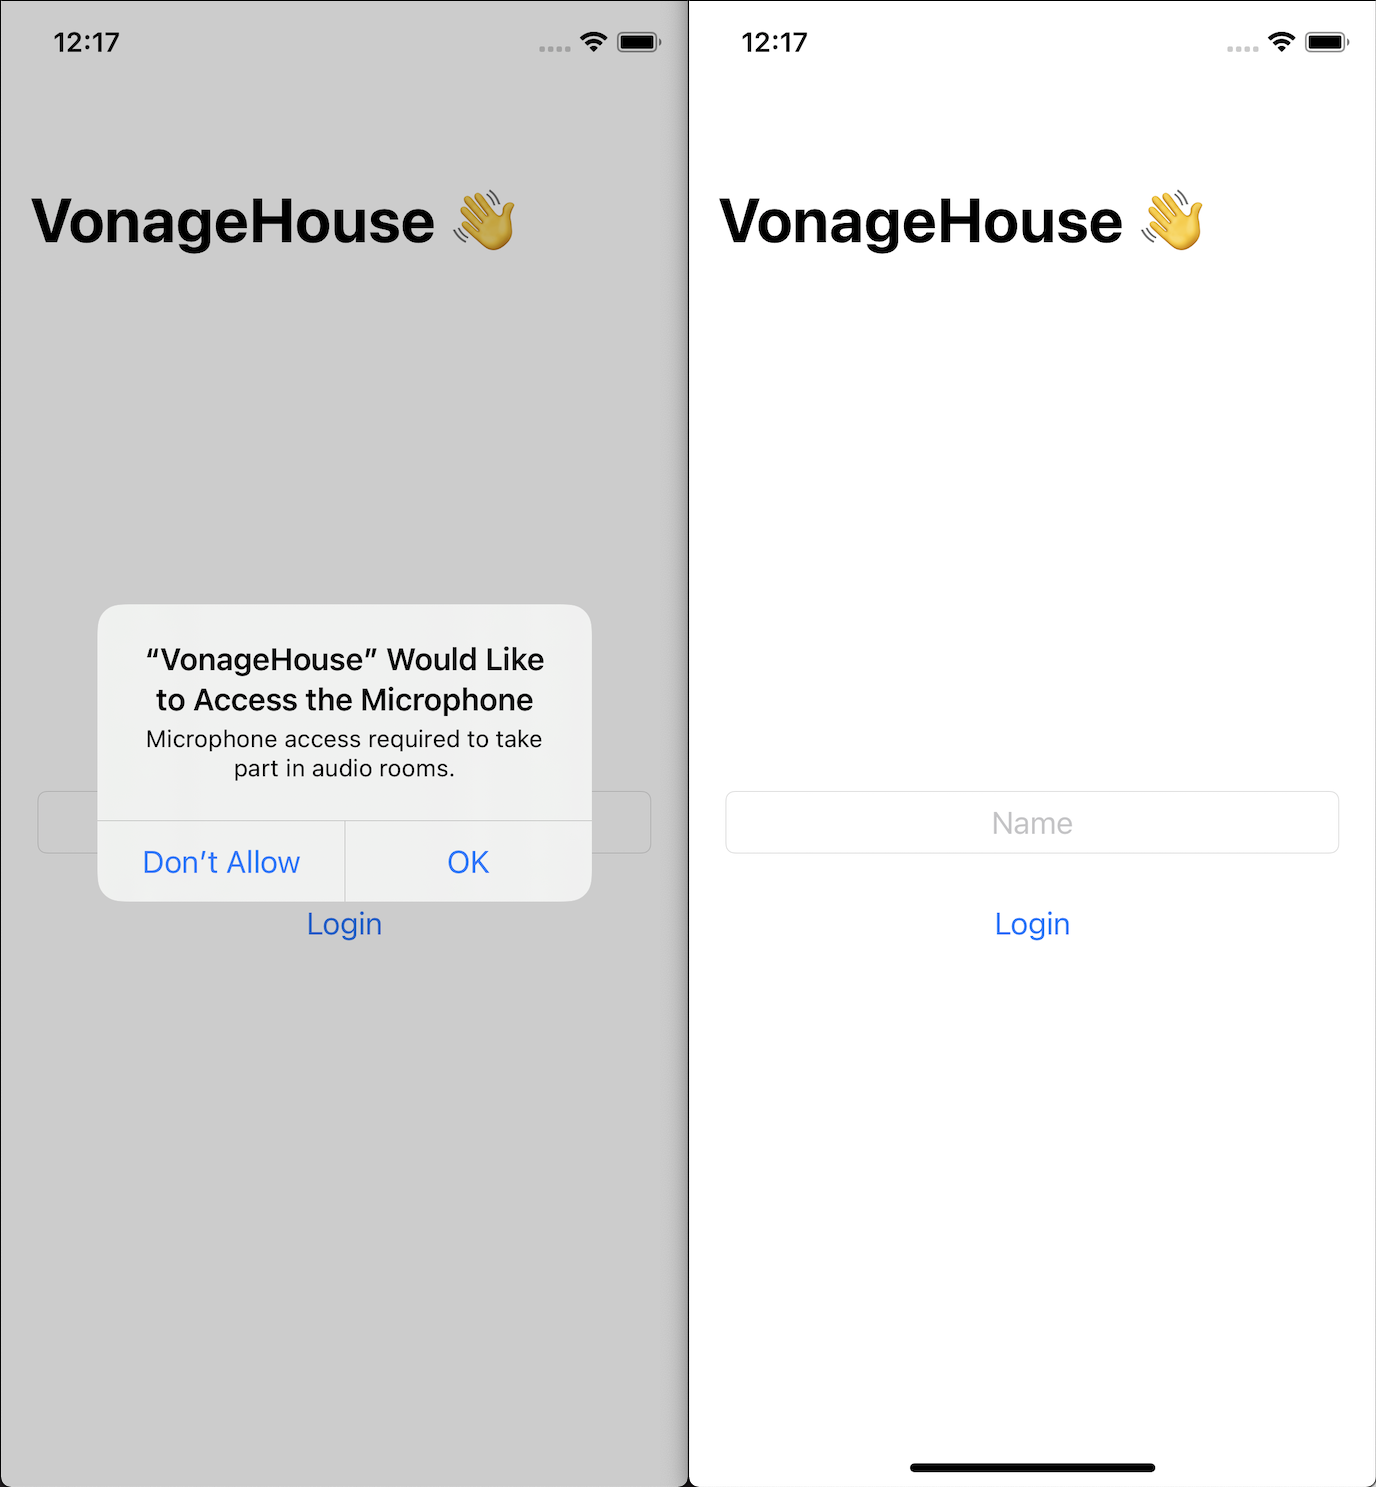
The input view also has a hidden NavigationLink that will push the next view, RoomListView, when the Client SDK successfully connects. If you comment out the NavigationLink line and run the project (CMD + R), you will see the login screen:

Create the Room List Screen
When the Client SDK connects successfully, you would want to request the backend server to get a list of all the open rooms. Similarly to the login screen, you will want to add the model structs then build a model class to handle the logic. Add the structs to the Models.swift file:
struct RoomResponse: Codable {
    let id: String
    let displayName: String

    enum CodingKeys: String, CodingKey {
        case id
        case displayName = "display_name"
    }
}

struct CreateRoom: Codable {
    struct Body: Codable {
        let displayName: String

        enum CodingKeys: String, CodingKey {
            case displayName = "display_name"
        }
    }

    struct Response: Codable {
        let id: String
    }
}
Create a new file called RoomListView.swift and add the model class:
import SwiftUI

final class RoomModel: ObservableObject {
    @Published var results = [RoomResponse]()
    @Published var loading = false
    @Published var showingCreateModal = false
    @Published var hasConv = false

    var convID: String? = nil
    var roomName: String = ""

    func loadRooms() {
        RemoteLoader.load(urlString: "https://URL.ngrok.io/rooms", body: Optional<String>.none, responseType: [RoomResponse].self) { result in
            switch result {
            case .success(let response):
                DispatchQueue.main.async {
                    self.results = response
                }
            default:
                break
            }
        }
    }

    func createRoom() {
        RemoteLoader.load(urlString: "https://URL.ngrok.io/rooms", body: CreateRoom.Body(displayName: self.roomName), responseType: CreateRoom.Response.self) { result in
            switch result {
            case .success(let response):
                self.convID = response.id
                DispatchQueue.main.async {
                    self.hasConv = true
                    self.loading = false
                    self.showingCreateModal = false
                }
            default:
                break
            }
        }
    }
}
This model class handles loading the list of rooms and sending the request to create a new room; replace the urlString string with your URL from ngrok. The UI will observe the results property.\
Next, create the UI that will observe this model class. Add the RoomListView struct to the same file:
struct RoomListView: View {
    @ObservedObject var roomModel = RoomModel()

    var body: some View {
        VStack {
            List(roomModel.results, id: \.id) { item in
                VStack(alignment: .leading) {
                    NavigationLink(destination: RoomView(convID: item.id, convName: item.displayName)) {
                        Text(item.displayName)
                    }
                }
            }.onAppear(perform: roomModel.loadRooms)
            Button("Create room") {
                roomModel.showingCreateModal.toggle()
            }
            NavigationLink("", destination: RoomView(convID: roomModel.convID ?? "", convName: roomModel.roomName),
                           isActive: $roomModel.hasConv).hidden()
        }
        .navigationTitle("VonageCottage 👋")
        .navigationBarBackButtonHidden(true)
        .navigationBarItems(trailing:
                                Button("Refresh") {
                                    roomModel.loadRooms()
                                }
        )
        .sheet(isPresented: $roomModel.showingCreateModal, content: {
            CreateRoomModal(roomModel: roomModel)
        })
    }
}
The RoomListView struct has a List component that will display the list of open rooms and a refresh button in the navigation bar. There is also a Button component, which toggles a boolean that shows a CreateRoomModal view. Add the view to the same file:
struct CreateRoomModal: View {
    @ObservedObject var roomModel: RoomModel

    var body: some View {
        if !roomModel.loading {
            VStack {
                TextField("Enter the room name", text: $roomModel.roomName)
                    .textFieldStyle(RoundedBorderTextFieldStyle())
                    .multilineTextAlignment(.center)
                    .padding(20)
                Button("Create room") {
                    roomModel.loading = true
                    roomModel.createRoom()
                }
            }
        } else {
            ProgressView()
        }
    }
}
This view consists of a TextField for room name entry, a loading state, and a Button to trigger the create room function on the RoomModel class. The two NavigationLink components in the RoomListView reference a RoomView. The RoomView takes a conversation ID as a parameter that the Client SDK needs to load the conversation.
Create the Room Screen
This final screen is where users of your application will join conversations and talk to each other. Much like the previous screens, you will start by adding a model struct to the Models.swift file:
struct Member: Hashable {
    let id: String
    let name: String
}
This struct will represent how a member of a room is displayed in the UI. Next, create a new file called RoomView.swift, and within that file, create a ConversationModel class:
import SwiftUI
import NexmoClient

final class ConversationModel: NSObject, ObservableObject, NXMConversationDelegate {
    @Published var loading = false
    @Published var members = [Member]()

    private var conversation: NXMConversation?

    func memberFrom(_ nxmMember: NXMMember) -> Member {
        return Member(id: nxmMember.memberUuid, name: nxmMember.user.name)
    }

    func conversation(_ conversation: NXMConversation, didReceive event: NXMMemberEvent) {
        let member = memberFrom(event.member)
        switch event.state {
        case .joined:
            guard !self.members.contains(member),
                  NXMClient.shared.user?.name != member.name else { break }
            self.members.append(member)
        case .left:
            guard self.members.contains(member),
                  let memberIndex = self.members.firstIndex(of: member) else { break }
            self.members.remove(at: memberIndex)
        default:
            break
        }
    }

    func conversation(_ conversation: NXMConversation, didReceive error: Error) {
        print(error.localizedDescription)
    }
}
The ConversationModel class conforms to NXMConversationDelegate in addition to the ObservableObject protocol like the other model classes. The two functions from the NXMConversationDelegate that you will be using are didReceive:event and didReceive:error.
The didReceive:event function is how the iOS application will be notified of users leaving and joining the conversation. When this happens, members are added and removed from the members array, which the UI observes.
Now you can add the functions that handle loading and leaving conversations to the ConversationModel class:
final class ConversationModel: NSObject, ObservableObject, NXMConversationDelegate {
    ...
    func loadConversation(convID: String) {
        guard conversation == nil else { return }

        loading = true
        NXMClient.shared.getConversationWithUuid(convID) { error, conversation in
            self.conversation = conversation
            self.conversation?.delegate = self

            self.conversation?.join { error, member in
                DispatchQueue.main.async {
                    self.loading = false
                    self.members = self.conversation!.allMembers.map { self.memberFrom($0) }
                    if !self.members.contains(where: { $0.name == member?.user.name }) {
                        self.members.append(self.memberFrom(member!))
                    }
                }

                DispatchQueue.main.asyncAfter(deadline: .now() + 0.1) {
                    self.conversation?.enableMedia()
                }
            }
        }
    }

    func leaveConversation(completion: () -> Void) {
        self.conversation?.disableMedia()
        self.conversation?.leave(nil)
        completion()
    }
    ...
}
The loadConversation function calls getConversationWithUuid on the Client SDK, returning the conversation object stored in a local property.\
Now that you have the conversation object, you can join the conversation. Once that is complete, you can enable media for the user, allowing them to speak and hear other users in the conversation.\
leaveConversation does the opposite. It disables media, leaves the conversation, and calls a completion handler passed to the function.
The UI for this screen is split into two structs, a smaller view for a single member and a bigger view with a grid of members and handles navigation. Create the MemberView struct in the same file:
struct MemberView: View {
    var memberName: String

    var body: some View {
        VStack {
            Circle()
                .fill(Color.gray)
                .frame(width: 75, height: 75)
            Text(memberName)
        }
    }
}
This is a circle with Text component beneath for the room member's name. Next add the RoomView:
struct RoomView: View {
    @ObservedObject var conversationModel = ConversationModel()
    @Environment(\.presentationMode) var presentationMode

    var convID: String
    var convName: String

    let columns = [
        GridItem(.flexible()),
        GridItem(.flexible()),
        GridItem(.flexible())
    ]

    var body: some View {
        VStack {
            if conversationModel.loading {
                ProgressView()
                Text("Loading").padding(20)
            } else {
                VStack {
                    ScrollView {
                        LazyVGrid(columns: columns, spacing: 75) {
                            ForEach(conversationModel.members, id: \.self) { member in
                                MemberView(memberName: member.name)
                            }
                        }
                    }
                    Button("Leave room") {
                        conversationModel.leaveConversation(completion: { presentationMode.wrappedValue.dismiss() })
                    }
                }
            }
        }.navigationTitle(convName)
        .navigationBarBackButtonHidden(true)
        .onAppear(perform: {
            conversationModel.loadConversation(convID: convID)
        })
    }
}
This view has a presentationMode property that will allow the view to be dismissed when the user leaves the conversation/room, and a three-column wide grid where the room members will be displayed.
Run Your Application
If you run the project (CMD + R), you will first be prompted to allow microphone permissions if you have not already.
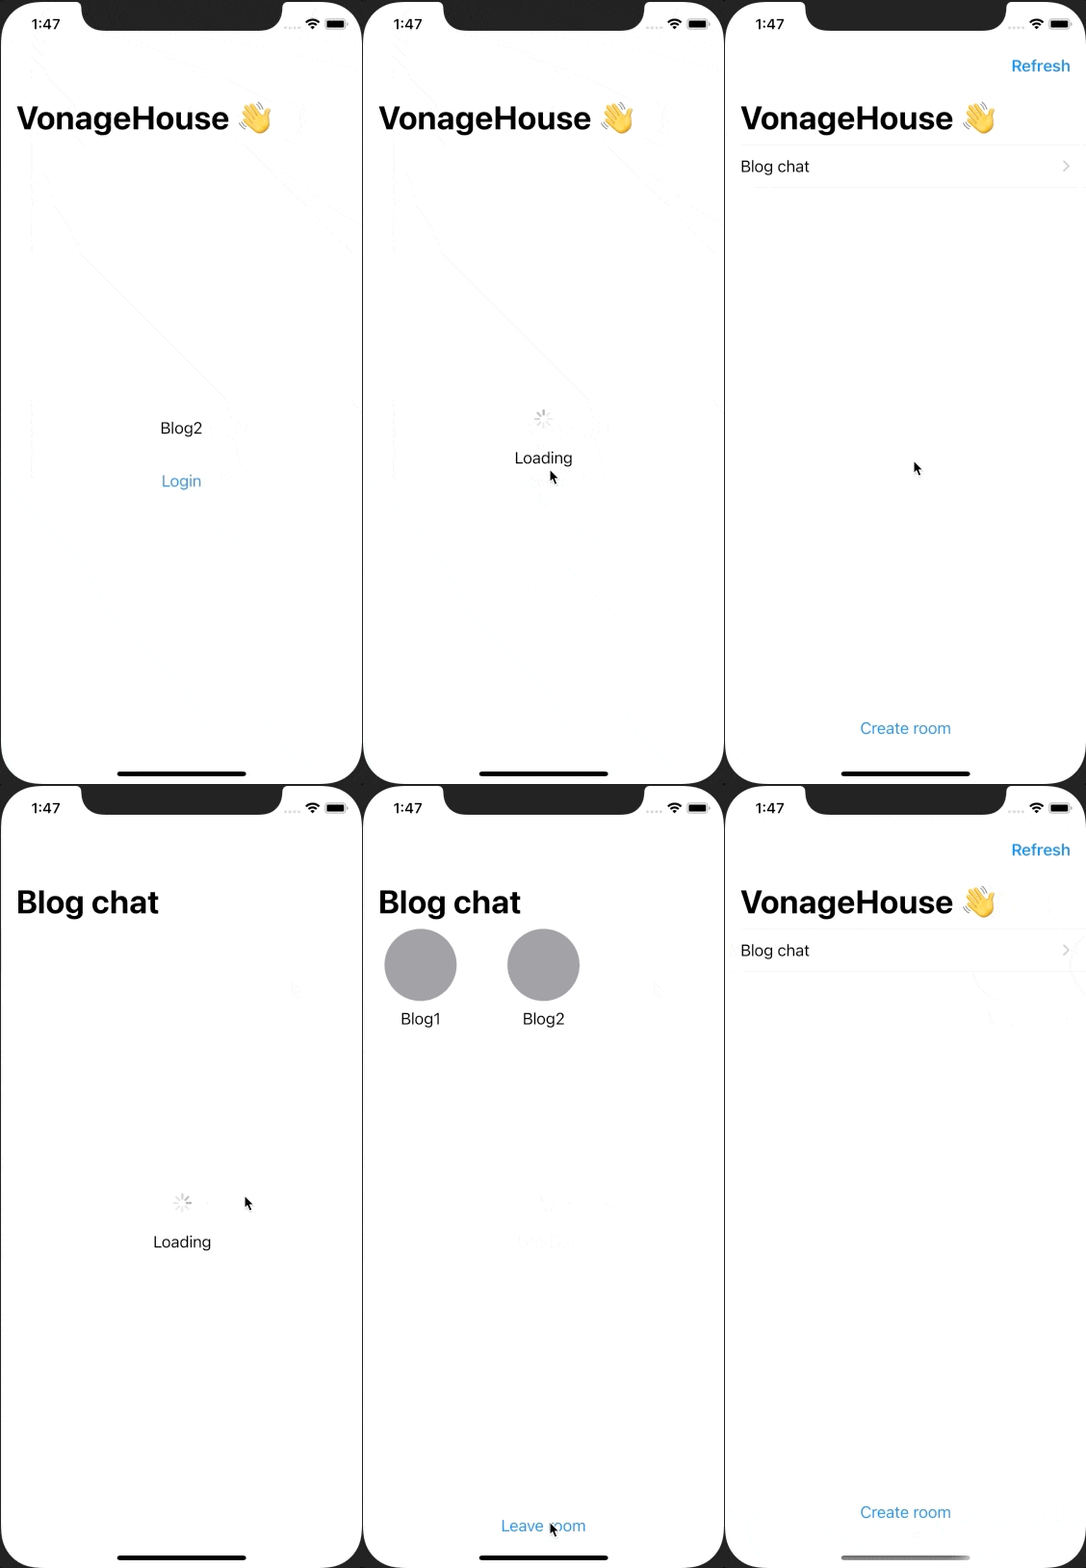
Log in with a username, and you will be taken to the room list screen where you can create a room. Creating a room will take you to the room view. Repeat the same steps with a different username and device, and you will be able to chat in the room!

What Is Next?
You can find the completed iOS application project on GitHub. You can do a lot more with the Client SDK, learn more on developer.vonage.com.