Handling VoIP Push Notifications with CallKit
In this tutorial, you will use CallKit to handle the VoIP push notifications sent to an iOS device when using the Vonage Client SDK for iOS. CallKit allows you to integrate your iOS application into the system so your application can look like a native iOS phone call.
Vonage API Account
To complete this tutorial, you will need a Vonage API account. If you don’t have one already, you can sign up today and start building with free credit. Once you have an account, you can find your API Key and API Secret at the top of the Vonage API Dashboard.
This tutorial also uses a virtual phone number. To purchase one, go to Numbers > Buy Numbers and search for one that meets your needs.
Prerequisites
- An Apple Developer account and test device.
- A GitHub account.
- Xcode 12 and Swift 5 or greater.
- Cocoapods to install the Vonage Client SDK for iOS.
- Our Command Line Interface. You can install it with
npm install nexmo-cli@beta -g.
The Starter Project
This tutorial will be building on top of the "Receiving a phone call in-app" from the Vonage developer portal. The tutorial will start from cloning the finished project from GitHub, but if you are not familiar with using the Vonage Client SDK for iOS to receive a call, you can start with the tutorial. If you follow the tutorial, you can skip ahead to the create push certificates section.
Create an NCCO
A Nexmo Call Control Object (NCCO) is a JSON array that you use to control the flow of a Voice API call. The NCCO must be public and accessible by the internet. To accomplish that, you will be using a GitHub Gist that provides a convenient way to host the configuration.
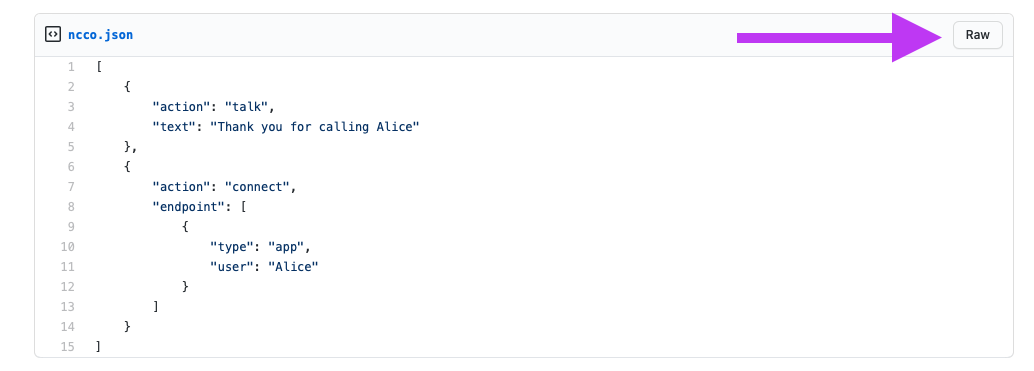
Go to https://gist.github.com and enter ncco.json into "Filename including extension" box. The contents of the gist will be the following JSON:
[
    {
        "action": "talk",
        "text": "Thank you for calling Alice"
    },
    {
        "action": "connect",
        "endpoint": [
            {
                "type": "app",
                "user": "Alice"
            }
        ]
    }
]
Create the gist, then click the "Raw" button to get a URL for your NCCO. Keep note of it for the next step.
Set up a Vonage Application
You now need to create a Vonage Application. An application contains the security and configuration information you need to connect to Vonage. Create a directory for your project using mkdir vonage-tutorial in your terminal, then change into the new directory using cd vonage-tutorial. Create a vonage application using the following command replacing GIST_URL with the URL from the previous step:
nexmo app:create "Phone To App Tutorial" --capabilities=voice --keyfile=private.key --voice-event-url=https://example.com/ --voice-answer-url=GIST_URL
A file named .nexmo-app is created in your project directory and contains the newly created Vonage Application ID and the private key. A private key file named private.key is also created.
Since the iOS app will be receiving an inbound call from a phone, you will need to buy and link a Vonage number to your application. You can buy a number by running nexmo number:buy -c US --confirm. The command buys a US number, but you can specify an alternate two-character country code to purchase a number in another country. You can now link your new number to your application using nexmo link:app YOUR_VONAGE_NUMBER APPLICATION_ID replacing YOUR_VONAGE_NUMBER with the newly generated number and APPLICATION_ID with your application ID.
The next step would be to create a user for your application, you can do so by running nexmo user:create name="Alice" to create a user called Alice. The Client SDK uses JWTs for authentication. The JWT identifies the user name, the associated application ID and the permissions granted to the user. It is signed using your private key to prove that it is a valid token. You can create a JWT for the Alice user by running the following command replacing APP_ID with your application ID from earlier:
nexmo jwt:generate ./private.key exp=$(($(date +%s)+21600)) acl='{"paths":{"/*/users/**":{},"/*/conversations/**":{},"/*/sessions/**":{},"/*/devices/**":{},"/*/image/**":{},"/*/media/**":{},"/*/applications/**":{},"/*/push/**":{},"/*/knocking/**":{}}}' sub=Alice application_id=APP_ID
Clone the iOS Project
To get a local copy of the iOS project your terminal, enter git clone git@github.com:nexmo-community/client-sdk-swift-voice-phone-to-app.git in your terminal. Change directory into the client-sdk-swift-voice-phone-to-app folder by using cd client-sdk-swift-voice-phone-to-app. Then make sure that the dependencies of the project are up to date. You can do so by running pod install. Once complete, you can open the Xcode project by running using open PhoneToApp.xcworkspace.
Set up Push Certificates
There are two types of push notifications that you can use in an iOS app, VoIP pushes with PushKit or User Notifications. This tutorial will be focusing on VoIP pushes. Apple Push Notifications service (APNs) uses certificate-based authentication to secure the connections between APNs and Vonage servers. So you will need to create a certificate and upload it to the Vonage Servers so Vonage can send a push to the device when there is an incoming call.
Adding a Push Notification Capability
To use push notifications, you are required to add the push notification capability to your Xcode project. Make sure you are logged into your Apple developer account in Xcode via preferences. If so, select your target and then choose Signing & Capabilities:

Then select add capability and add the Push Notifications capability:

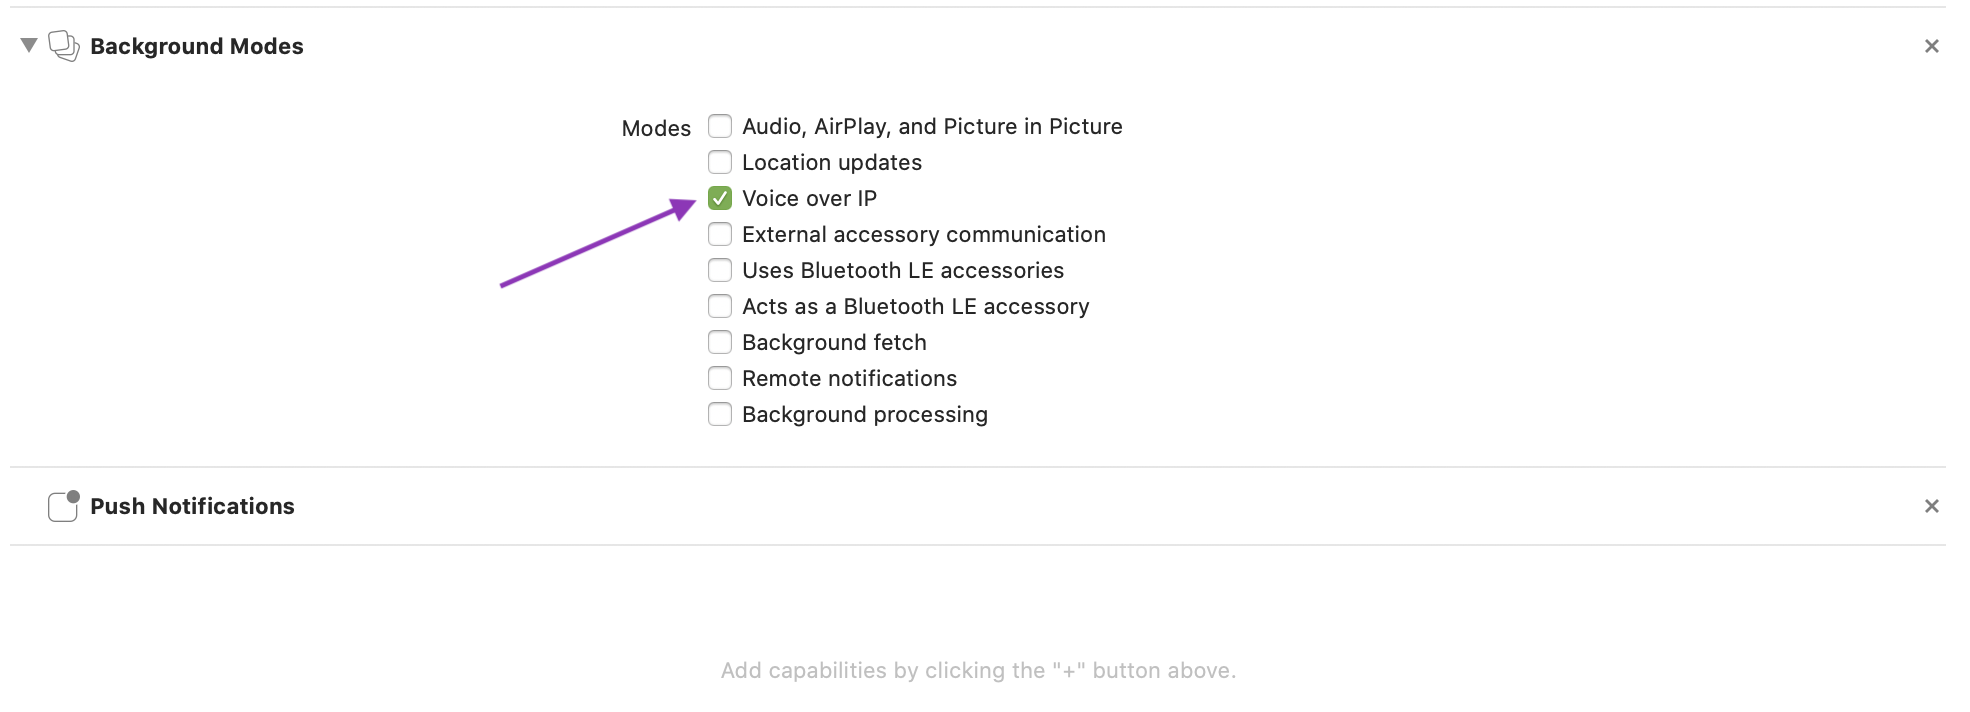
If Xcode is automatically managing your app's signing, it will update the provisioning profile linked to your Bundle Identifier to include the capability. Repeat the process for the Background Modes capability and select Voice over IP:
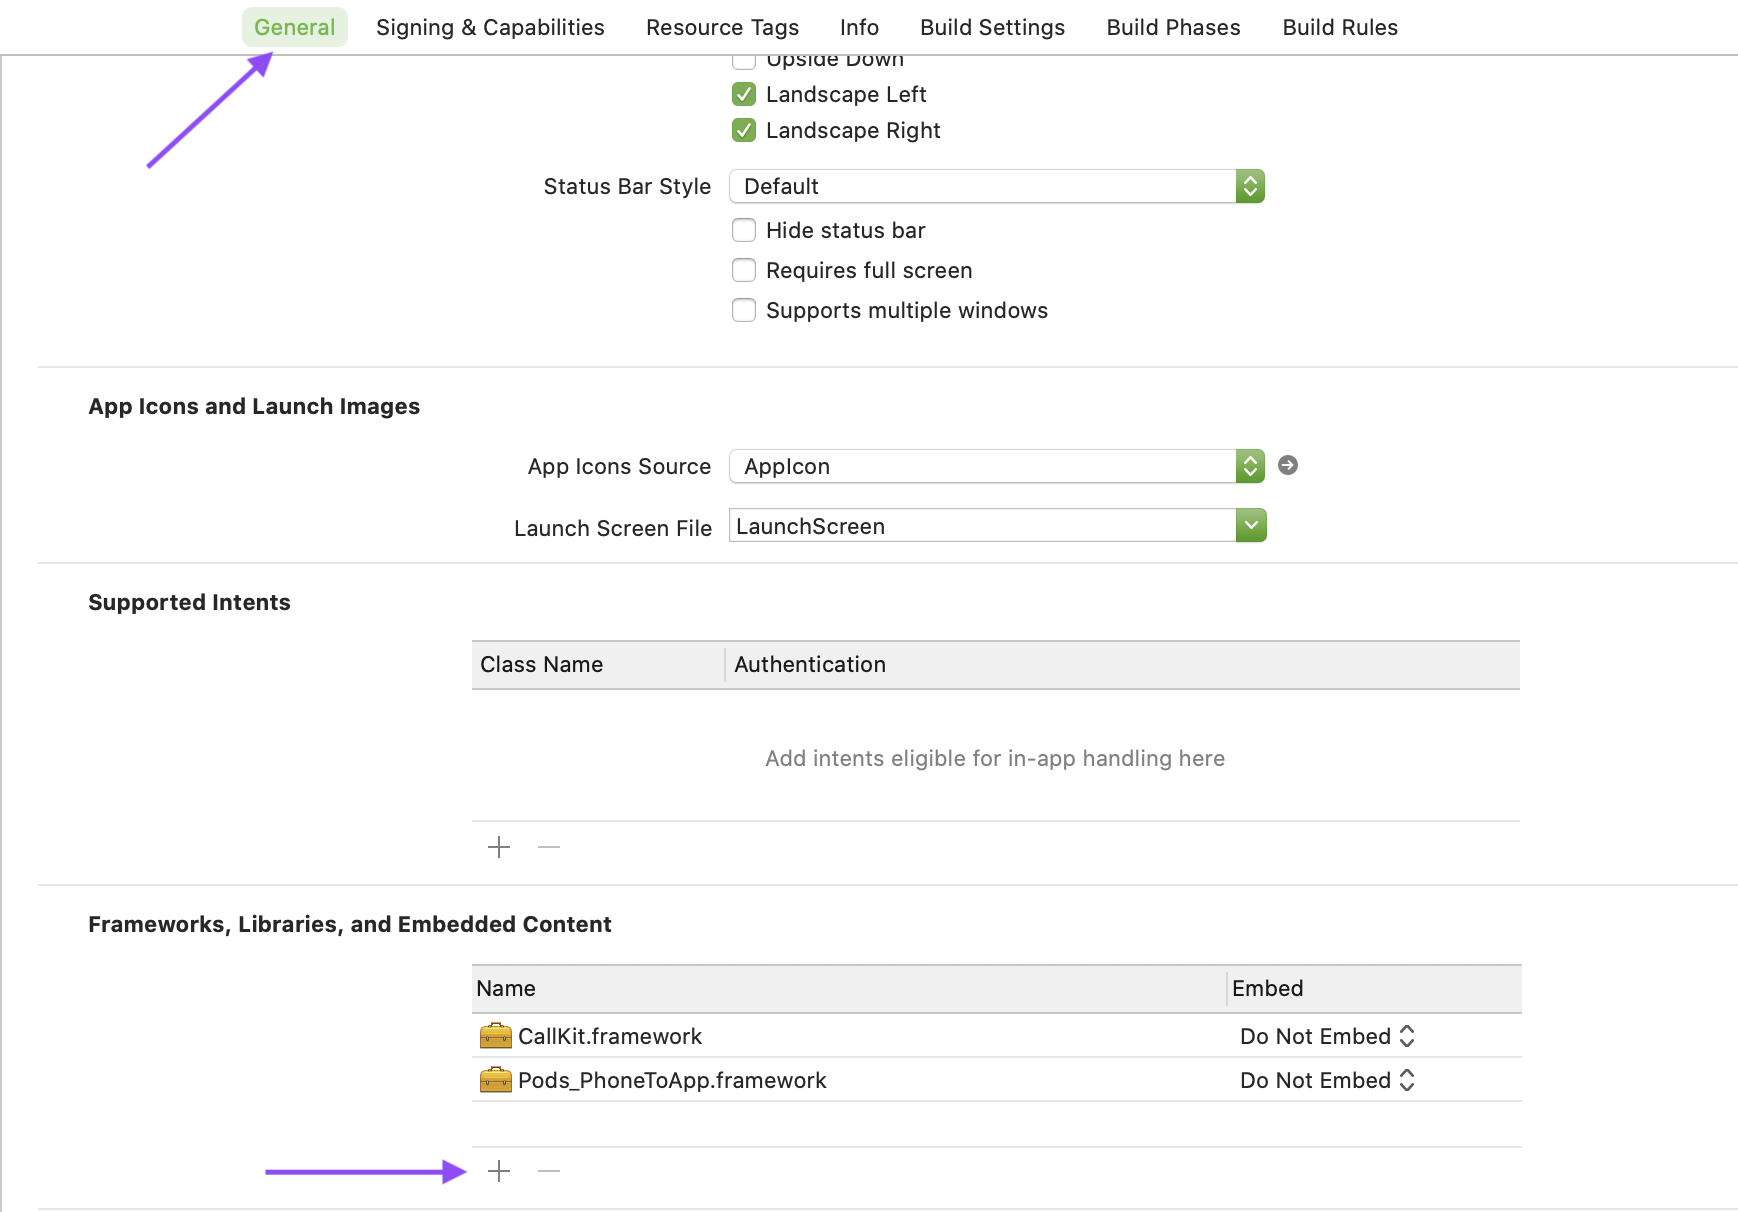
When using VoIP push notifications, you have to use the CallKit framework. Link it to your project by adding it under Frameworks, Libraries, and Embedded Content under General:
Generating a Push Certificate
To generate a push certificate, you will need to log in to your Apple developer account and head to the Certificates, Identifiers & Profiles page and add a new certificate:

Choose a VoIP Services Certificate and continue. You will now need to choose the App ID for the app that you want to add VoIP push notifications to and continue. If your app is not listed, you will have to create an App ID. Xcode can do this for you if it automatically manages your signing. Otherwise, you can create a new App ID on the Certificates, Identifiers & Profiles page under Identifiers. Make sure to select the push notifications capability when doing so.
You will be prompted to upload a Certificate Signing Request (CSR). You can follow the instructions on Apple's help website to create a CSR on your Mac. Once the CSR is uploaded, you will be able to download the certificate. Double click the .cer file to install it in Keychain Access.
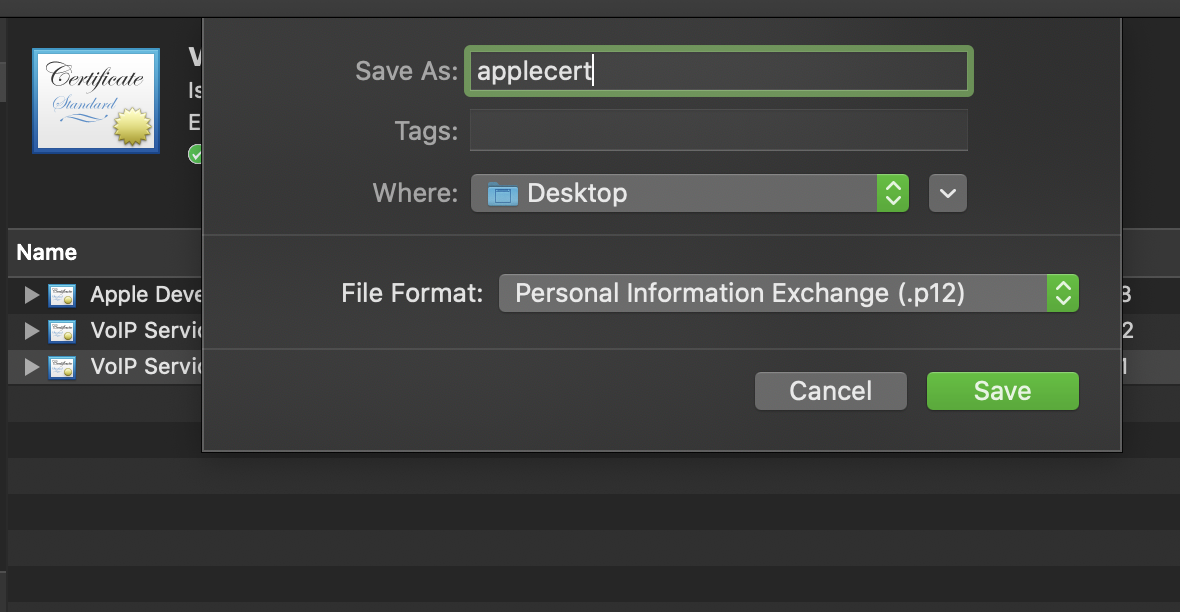
To get the push certificate in the format that is needed by the Vonage servers, you will need to export it. Locate your VoIP Services certificate in Keychain Access and right-click to export it. Name the export applecert and select .p12 as the format:
Upload Your Push Certificate
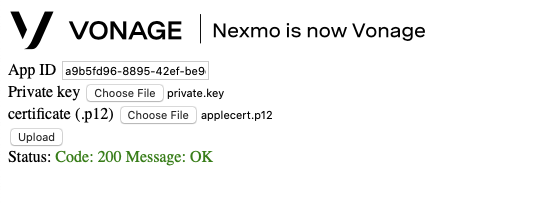
Now that you have a push certificate linked to your iOS application, you need to upload it to the Vonage servers. You upload your certificate to the Vonage servers by making a POST request, you can do so using your terminal or using the upload tool. Using the terminal, clone the upload tool with git clone git@github.com:nexmo-community/ios-push-uploader.git, then change into the directory with cd ios-push-uploader. To run the tool, install the dependencies with npm install once that is complete run the project with node server.js. The tool will be available on your localhost on port printed to the terminal.
Enter your Vonage Application ID, private key, and certificate file and upload. The page will show the status of your upload on the page once it is complete.
The ClientManager Class
Create a new Swift file (CMD + N) and call it ClientManager. This class will encapsulate the code needed to interface with the Client SDK since you will need to get information from the Client SDK in multiple places in future steps:
final class ClientManager: NSObject {

    static let shared = ClientManager()

    static let jwt = "ALICE_JWT"

    override init() {
        super.init()
        initializeClient()
    }

    func initializeClient() {
        NXMClient.shared.setDelegate(self)
    }

    func login() {
        guard !NXMClient.shared.isConnected() else { return }
        NXMClient.shared.login(withAuthToken: ClientManager.jwt)
    }
}
Replace ALICE_JWT with the JWT you generated earlier, in a production environment, this is where you would fetch a JWT fro your authentication server/endpoint. With this new class, you will need to move the call Client SDK code from the ViewController class to the ClientManager class. The two classes will communicate with NotificationCenter observers. Make the following changes to your ViewController class:
class ViewController: UIViewController {

    let connectionStatusLabel = UILabel()
    var call: NXMCall?

    override func viewDidLoad() {
        super.viewDidLoad()
        // Do any additional setup after loading the view.

        connectionStatusLabel.text = "Connected"
        connectionStatusLabel.textAlignment = .center
        connectionStatusLabel.translatesAutoresizingMaskIntoConstraints = false

        view.addSubview(connectionStatusLabel)
        view.addConstraints(NSLayoutConstraint.constraints(withVisualFormat: "H:|-20-[label]-20-|",
                                                           options: [], metrics: nil, views: ["label" : connectionStatusLabel]))
        view.addConstraints(NSLayoutConstraint.constraints(withVisualFormat: "V:|-80-[label(20)]",
                                                           options: [], metrics: nil, views: ["label" : connectionStatusLabel]))

        NotificationCenter.default.addObserver(self, selector: #selector(statusReceived(_:)), name: .clientStatus, object: nil)
        NotificationCenter.default.addObserver(self, selector: #selector(callReceived(_:)), name: .incomingCall, object: nil)
        NotificationCenter.default.addObserver(self, selector: #selector(callHandled), name: .handledCallCallKit, object: nil)
    }

    deinit {
        NotificationCenter.default.removeObserver(self)
    }

    @objc func statusReceived(_ notification: NSNotification) {
        DispatchQueue.main.async { [weak self] in
            self?.connectionStatusLabel.text = notification.object as? String
        }
    }

    @objc func callReceived(_ notification: NSNotification) {
        DispatchQueue.main.async { [weak self] in
            if let call = notification.object as? NXMCall {
                self?.displayIncomingCallAlert(call: call)
            }
        }
    }

    @objc func callHandled() {
        DispatchQueue.main.async { [weak self] in
            if self?.presentedViewController != nil {
                self?.dismiss(animated: true, completion: nil)
            }
        }
    }

    func displayIncomingCallAlert(call: NXMCall) {
        var from = "Unknown"
        if let otherParty = call.otherCallMembers.firstObject as? NXMCallMember {
            from = otherParty.channel?.from.data ?? "Unknown"
        }
        let alert = UIAlertController(title: "Incoming call from", message: from, preferredStyle: .alert)
        alert.addAction(UIAlertAction(title: "Answer", style: .default, handler: { _ in
            self.call = call
            NotificationCenter.default.post(name: .handledCallApp, object: nil)
            call.answer(nil)

        }))
        alert.addAction(UIAlertAction(title: "Reject", style: .default, handler: { _ in
            NotificationCenter.default.post(name: .handledCallApp, object: nil)
            call.reject(nil)
        }))

        self.present(alert, animated: true, completion: nil)
    }
}
Rather than logging being the delegate for the Client SDK, the ViewController class now listens for updates and reacts to them. Now update the ClientManager class to send these updates. Add the following to the end of the ClientManager.swift file:
extension ClientManager: NXMClientDelegate {
    func client(_ client: NXMClient, didChange status: NXMConnectionStatus, reason: NXMConnectionStatusReason) {
        let statusText: String

        switch status {
        case .connected:
            statusText = "Connected"
        case .disconnected:
            statusText = "Disconnected"
        case .connecting:
            statusText = "Connecting"
        @unknown default:
            statusText = "Unknown"
        }

        NotificationCenter.default.post(name: .clientStatus, object: statusText)
    }

    func client(_ client: NXMClient, didReceiveError error: Error) {
        NotificationCenter.default.post(name: .clientStatus, object: error.localizedDescription)
    }

    func client(_ client: NXMClient, didReceive call: NXMCall) {
        NotificationCenter.default.post(name: .incomingCall, object: call)
    }
}

struct Constants {
    static let pushToken = "NXMPushToken"
    static let fromKeyPath = "nexmo.push_info.from_user.name"
}

extension Notification.Name {
    static let clientStatus = Notification.Name("Status")
    static let incomingCall = Notification.Name("Call")
    static let handledCallCallKit = Notification.Name("CallHandledCallKit")
    static let handledCallApp = Notification.Name("CallHandledApp")
}
Register for Push Notifications
The next step is to register a device for push notifications to let Vonage know which device to send the push notification to for which user. In the ClientManager class add the pushToken property and the following functions to handle the push token of the device:
final class ClientManager: NSObject {
    public var pushToken: Data?

    ...

    func invalidatePushToken() {
        self.pushToken = nil
        UserDefaults.standard.removeObject(forKey: Constants.pushToken)
        NXMClient.shared.disablePushNotifications(nil)
    }

    private func enableNXMPushIfNeeded(with token: Data) {
        if shouldRegisterToken(with: token) {
            NXMClient.shared.enablePushNotifications(withPushKitToken: token, userNotificationToken: nil, isSandbox: true) { error in
                if error != nil {
                    print("registration error: \(String(describing: error))")
                }
                print("push token registered")
                UserDefaults.standard.setValue(token, forKey: Constants.pushToken)
            }
        }
    }

    private func shouldRegisterToken(with token: Data) -> Bool {
        let storedToken = UserDefaults.standard.object(forKey: Constants.pushToken) as? Data

        if let storedToken = storedToken, storedToken == token {
            return false
        }

        invalidatePushToken()
        return true
    }
}
The enableNXMPushIfNeeded function takes a token, then uses the shouldRegisterToken function to check if the token has already been registered. If it has not enablePushNotifications on the client will register the push notification with Vonage. In the AppDelegate class you can now register for VoIP push notifications. Import PushKit at the top of the file:
import PushKit
Add a local instance of the ClientManager class:
class AppDelegate: UIResponder, UIApplicationDelegate {
    ...
    private let clientManager = ClientManager.shared
    ...
}
Create a new extension at the end of the file which contains a function to register the device for push notifications:
extension AppDelegate: PKPushRegistryDelegate {
    func registerForVoIPPushes() {
        let voipRegistry = PKPushRegistry(queue: nil)
        voipRegistry.delegate = self
        voipRegistry.desiredPushTypes = [PKPushType.voIP]
    }
}
Update the didFinishLaunchingWithOptions function to call the registerForVoIPPushes function and log in the Client SDK:
func application(_ application: UIApplication, didFinishLaunchingWithOptions launchOptions: [UIApplication.LaunchOptionsKey: Any]?) -> Bool {
    // Override point for customization after application launch.
    AVAudioSession.sharedInstance().requestRecordPermission { (granted:Bool) in
        print("Allow microphone use. Response: \(granted)")
    }
    registerForVoIPPushes()
    clientManager.login()
    return true
}
Add the PKPushRegistryDelegate functions to handle the push notification registration to the extension:
extension AppDelegate: PKPushRegistryDelegate {
    ...

    func pushRegistry(_ registry: PKPushRegistry, didUpdate pushCredentials: PKPushCredentials, for type: PKPushType) {
        clientManager.pushToken = pushCredentials.token
    }

    func pushRegistry(_ registry: PKPushRegistry, didInvalidatePushTokenFor type: PKPushType) {
        clientManager.invalidatePushToken()
    }
}
The push token is stored as a property on the ClientManager class as you only want to register the token with Vonage when the client is logged in so edit the NXMClientDelegate function in the ClientManager class to handle this:
func client(_ client: NXMClient, didChange status: NXMConnectionStatus, reason: NXMConnectionStatusReason) {
    let statusText: String

    switch status {
    case .connected:
        if let token = pushToken {
            enableNXMPushIfNeeded(with: token)
        }
        statusText = "Connected"
    case .disconnected:
        statusText = "Disconnected"
    case .connecting:
        statusText = "Connecting"
    @unknown default:
        statusText = "Unknown"
    }

    NotificationCenter.default.post(name: .clientStatus, object: statusText)
}
Handle Incoming Push Notifications
With the device registered, it can now receive push notifications from Vonage. The Client SDK has functions for checking is a push notification payload is the expected payload and for processing the payload. You can view the JSON Vonage sends in the push payload on [GitHub]https://github.com/nexmo-community/client-sdk-push-payload). When processNexmoPushPayload is called, it converts the payload into an NXMCall which is received on the didReceive function of the NXMClientDelegate. Implement the functions on the ClientManager class alongside a local variable to store an incoming push:
typealias PushInfo = (payload: PKPushPayload, completion: () -> Void)

final class ClientManager: NSObject {
    ...
    public var pushInfo: PushInfo?

    ...

    func isNexmoPush(with userInfo: [AnyHashable : Any]) -> Bool {
        return NXMClient.shared.isNexmoPush(userInfo: userInfo)
    }

    private func processNexmoPushPayload(with pushInfo: PushInfo) {
        guard let _ = NXMClient.shared.processNexmoPushPayload(pushInfo.payload.dictionaryPayload) else {
            print("Nexmo push processing error")
            return
        }
        pushInfo.completion()
        self.pushInfo = nil
    }

    ...
}
Much like the push token, you only want to process an incoming push when the Client SDK has been logged in, so update the NXMClientDelegate to process the push when the Client SDK successfully connects:
func client(_ client: NXMClient, didChange status: NXMConnectionStatus, reason: NXMConnectionStatusReason) {
    let statusText: String

    switch status {
    case .connected:
        if let token = pushToken {
            enableNXMPushIfNeeded(with: token)
        }
        if let pushInfo = pushInfo {
            processNexmoPushPayload(with: pushInfo)
        }
        statusText = "Connected"
    case .disconnected:
        statusText = "Disconnected"
    case .connecting:
        statusText = "Connecting"
    @unknown default:
        statusText = "Unknown"
    }

    NotificationCenter.default.post(name: .clientStatus, object: statusText)
}
The PKPushRegistryDelegate has a function that is called when there is an incoming push called didReceiveIncomingPushWith add it to the extension PKPushRegistryDelegate in the AppDelegate.swift file:
func pushRegistry(_ registry: PKPushRegistry, didReceiveIncomingPushWith payload: PKPushPayload, for type: PKPushType, completion: @escaping () -> Void) {
    if clientManager.isNexmoPush(with: payload.dictionaryPayload) {
        let pushDict = payload.dictionaryPayload as NSDictionary
        let from = pushDict.value(forKeyPath: Constants.fromKeyPath) as? String

        clientManager.pushInfo = (payload, completion)
    }
}
When your iOS application has an incoming VoIP push notification, you must handle it using the CXProvider class in the CallKit framework. Create a new Swift file (CMD + N) called ProviderDelegate:
import CallKit
import NexmoClient
import AVFoundation

struct PushCall {
    var call: NXMCall?
    var uuid: UUID?
    var answerBlock: (() -> Void)?
}

final class ProviderDelegate: NSObject {
    private let provider: CXProvider
    private let callController = CXCallController()
    private var activeCall: PushCall? = PushCall()

    override init() {
        provider = CXProvider(configuration: ProviderDelegate.providerConfiguration)
        super.init()
        provider.setDelegate(self, queue: nil)
        NotificationCenter.default.addObserver(self, selector: #selector(callReceived(_:)), name: .incomingCall, object: nil)
        NotificationCenter.default.addObserver(self, selector: #selector(callHandled), name: .handledCallApp, object:nil)
    }

    deinit {
        NotificationCenter.default.removeObserver(self)
    }

    static var providerConfiguration: CXProviderConfiguration = {
        let providerConfiguration = CXProviderConfiguration(localizedName: "Vonage Call")
        providerConfiguration.supportsVideo = false
        providerConfiguration.maximumCallsPerCallGroup = 1
        providerConfiguration.supportedHandleTypes = [.generic]
        return providerConfiguration
    }()
}
The activeCall property uses the PushCall struct to keep track of the active call's details, callController is a CXCallController object used by the class to handle user actions on the CallKit UI. This tutorial supports handling one call at a time, to handle multiple calls you will want to create a new class to encapsulate the two properties. Next, create an extension at the end of the file to implement the CXProviderDelegate:
extension ProviderDelegate: CXProviderDelegate {
    func providerDidReset(_ provider: CXProvider) {
        activeCall = PushCall()
    }

    func provider(_ provider: CXProvider, perform action: CXAnswerCallAction) {
        NotificationCenter.default.post(name: .handledCallCallKit, object: nil)
        if activeCall?.call != nil {
            answerCall(with: action)
        } else {
            activeCall?.answerBlock = { [weak self] in
                guard let self = self, self.activeCall != nil else { return }
                self.answerCall(with: action)
            }
        }
    }

    private func answerCall(with action: CXAnswerCallAction) {
        configureAudioSession()
        activeCall?.call?.answer(nil)
        activeCall?.call?.setDelegate(self)
        activeCall?.uuid = action.callUUID
        action.fulfill()
    }

    func provider(_ provider: CXProvider, perform action: CXEndCallAction) {
        hangup()
    }

    func reportCall(callerID: String) {
        let update = CXCallUpdate()
        let callerUUID = UUID()

        update.remoteHandle = CXHandle(type: .generic, value: callerID)
        update.localizedCallerName = callerID
        update.hasVideo = false

        provider.reportNewIncomingCall(with: callerUUID, update: update) { [weak self] error in
            guard error == nil else { return }
            self?.activeCall?.uuid = callerUUID
        }
    }

    /*
     If the app is in the foreground and the call is answered via the
     ViewController alert, there is no need to display the CallKit UI.
     */
    @objc private func callHandled() {
        provider.invalidate()
    }

    @objc private func callReceived(_ notification: NSNotification) {
        if let call = notification.object as? NXMCall {
            activeCall?.call = call
            activeCall?.answerBlock?()
        }
    }

    // When the device is locked, the AVAudioSession needs to be configured.
    private func configureAudioSession() {
        let audioSession = AVAudioSession.sharedInstance()
        do {
            try audioSession.setCategory(AVAudioSession.Category.playAndRecord, mode: .default)
            try audioSession.setMode(AVAudioSession.Mode.voiceChat)
        } catch {
            print(error)
        }
    }
}
When the CallKit UI answers the call, it calls the CXAnswerCallAction delegate function. If the device is locked, the Client SDK needs time to reinitialize, so the answerCall actions are stored in a closure. If the app is in the foreground, the call object is not nil; the call is ready to be answered. The reportCall function will be called from the AppDelegate class when an incoming push notification is received to tell the system to display the CallKit UI with the option to either pick up or reject the call.
The callReceived function would be called after the push payload is processed so you will store it and call the answerBlock function if it is not nil. It will not be nil if the device has picked up the call before the Client SDK has not had enough time to set up and process the push notification payload.
The handledCallCallKit notification is sent so that the ViewController class knows that the call has been handled by CallKit UI and can dismiss the alert shown to pick up a call. Add an extension to keep track of the status of the ongoing call using the NXMCallDelegate:
extension ProviderDelegate: NXMCallDelegate {
    func call(_ call: NXMCall, didReceive error: Error) {
        print(error)
        hangup()
    }

    func call(_ call: NXMCall, didUpdate callMember: NXMCallMember, with status: NXMCallMemberStatus) {
        switch status {
        case .canceled, .failed, .timeout, .rejected, .completed:
            hangup()
        default:
            break
        }
    }

    func call(_ call: NXMCall, didUpdate callMember: NXMCallMember, isMuted muted: Bool) {}

    private func hangup() {
        if let uuid = activeCall?.uuid {
            activeCall?.call?.hangup()
            activeCall = PushCall()

            let action = CXEndCallAction(call: uuid)
            let transaction = CXTransaction(action: action)

            callController.request(transaction) { error in
                if let error = error {
                    print(error)
                }
            }
        }
    }
}
If there is an error with the call or the other party hangs up, the Client SDK will end the call, and the system notified with a CXEndCallAction via the callController object. Now that the ProviderDelegate class is complete create an instance of it in the AppDelegate class and call reportCall when there is an incoming call:
class AppDelegate: UIResponder, UIApplicationDelegate {
    ...

    private let providerDelegate = ProviderDelegate()

    ...
}

extension AppDelegate: PKPushRegistryDelegate {

    ...

    func pushRegistry(_ registry: PKPushRegistry, didReceiveIncomingPushWith payload: PKPushPayload, for type: PKPushType, completion: @escaping () -> Void) {
        if clientManager.isNexmoPush(with: payload.dictionaryPayload) {
            let pushDict = payload.dictionaryPayload as NSDictionary
            let from = pushDict.value(forKeyPath: Constants.fromKeyPath) as? String

            clientManager.pushInfo = (payload, completion)
            providerDelegate.reportCall(callerID: from ?? "Vonage Call")
        }
    }
}
Try it out
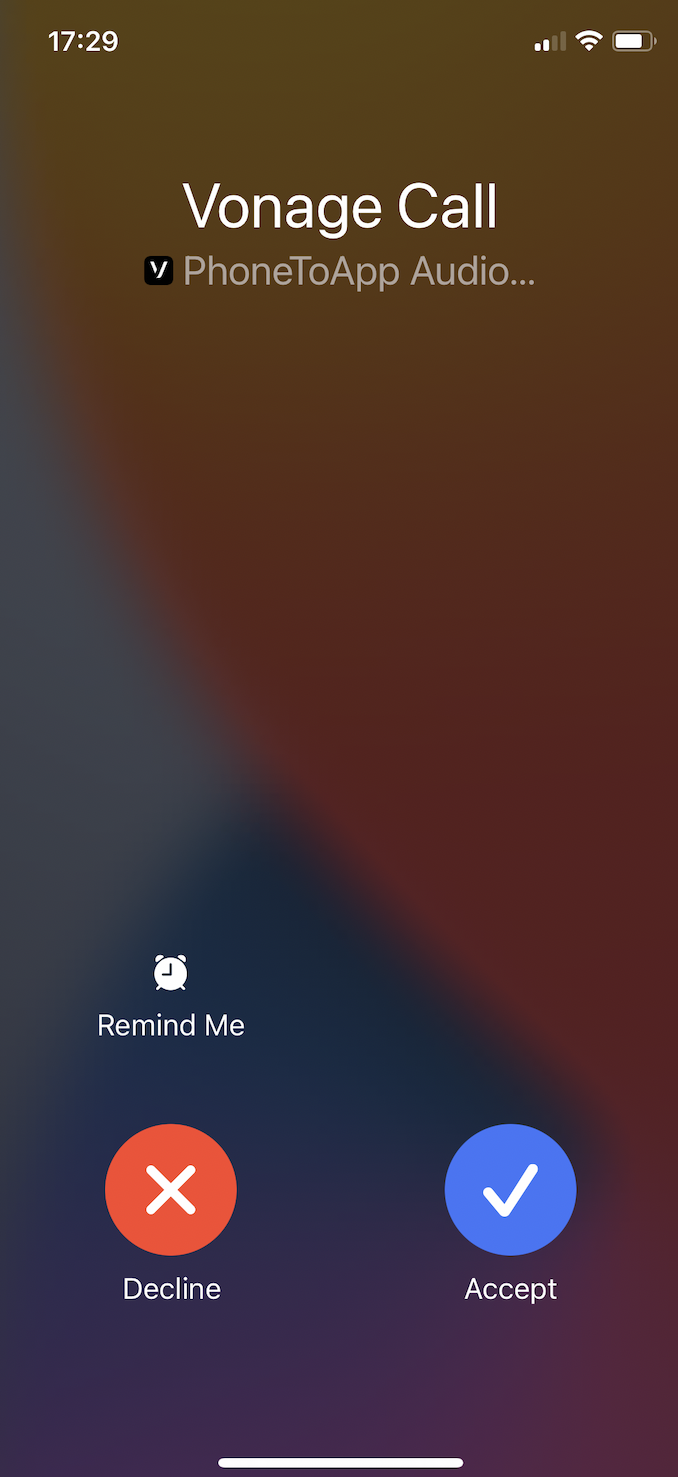
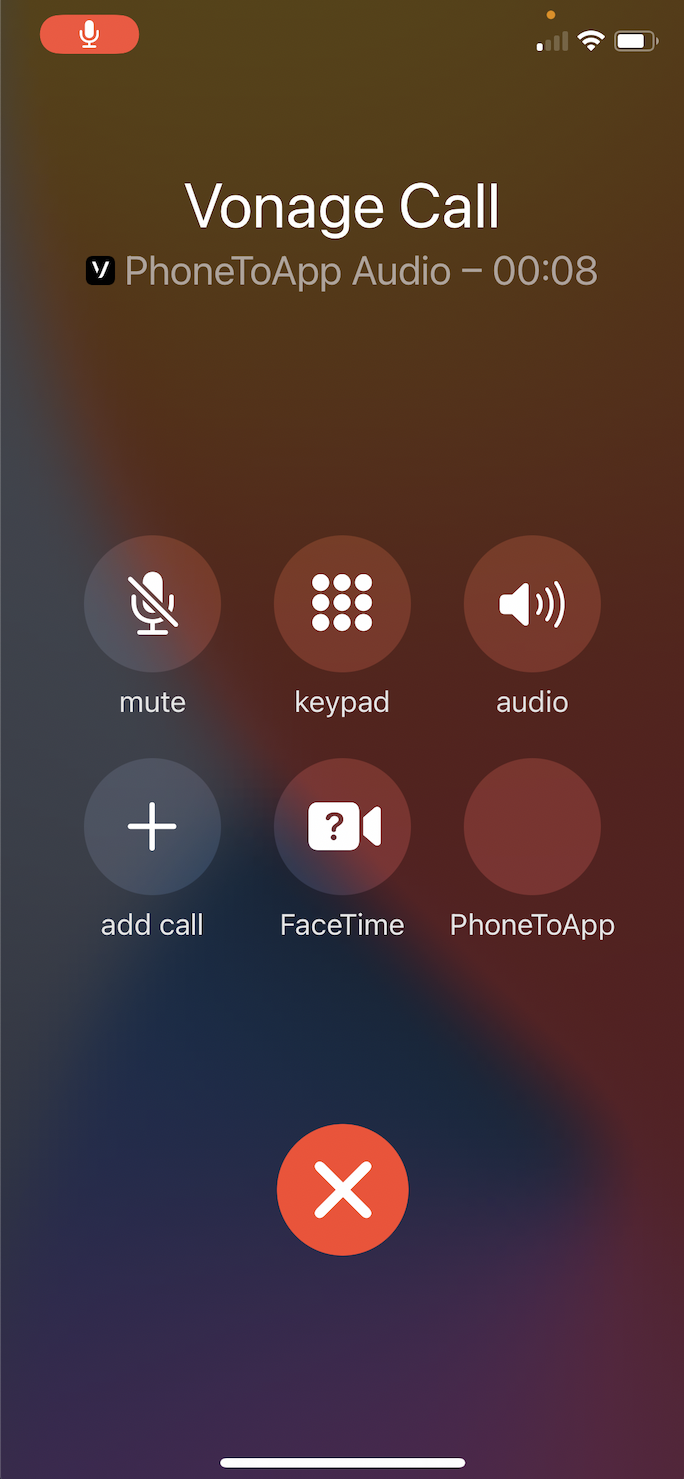
Build and Run (CMD + R) the project onto your iOS device, accept the microphone permissions, and lock the device. Then call the number linked to your Vonage Application from earlier. You will see the incoming call directly on your lock screen; then once you pick up it will go into the familiar iOS call screen:
If you check the call logs on the device, you will also see the call listed there.
What Next?
You can find the completed project on GitHub. You can do a lot more with the Client SDK and CallKit; you can use CallKit for outbound calls. Learn more about the Client SDK on developer.nexmo.com and CallKit on developer.apple.com
