How to send SMS Messages with Swift, Vapor and Vonage
Introduction
The Vonage SMS API allows you to send text messages programmatically. This tutorial covers how to use the Vonage SMS API with Vapor to send an SMS.
Prerequisites
Vonage API Account
To complete this tutorial, you will need a Vonage API account. If you don’t have one already, you can sign up today and start building with free credit. Once you have an account, you can find your API Key and API Secret at the top of the Vonage API Dashboard.
- Xcode 12 and Swift 5 or greater.
- Vapor 4.0 installed on your machine.
Create a Vapor Project
You can create a Vapor project using the new project command vapor new SwiftTextMessage in your terminal. It will first prompt you whether you would like to Fluent (press n to skip), then whether you want to use Leaf. Leaf is a templating language that you will use to generate dynamic HTML pages, so press y to include it.
Once the command has finished, change directory into the folder it created for you using cd SwiftTextMessage.
You will also need to create a .env file to store your Vonage API account credentials. In your terminal, use the following command to create the file replacing X and Y with your API key and secret, respectively:
echo "APIKEY=X \nAPISECRET=Y" > .env
Now you can open the project in Xcode using vapor xcode. Once Xcode opens, it will start downloading the dependencies that Vapor relies on using Swift Package Manager (SPM). To view the dependencies, you can open the Package.swift file.
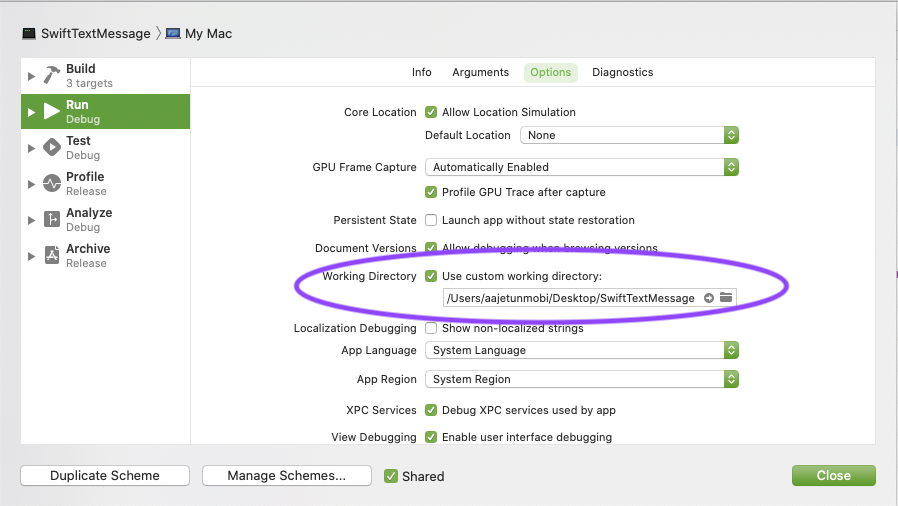
By default, Xcode runs your application from a randomized local directory. Since you will be loading local resources, you need to set a custom working directory. Go to Product > Scheme > Edit Scheme... and set the working directory to your project's root folder.

Press CMD+R to build and run. Once complete, find your web page at localhost:8080.
Create a Web Page
Now that your project is set up, you will create an interface to enter a phone number and message for the SMS. Open the index.leaf file under Resources/Views and update it:
<!doctype html>
<html lang="en">
  <head>
    <meta charset="utf-8">
    <title>Send a text message</title>
  </head>

  <body>
    <h1>Send a text message using the Vonage SMS API</h1>

    #if(status):
      <p> Status of the last SMS: #(status)</p>
    #endif

    <form action="/send" method="post">
        <p>
        <label>Phone number E.g. 447000000000</label><br>
        <input type="text" name="to" place>
        </p>

        <p>
        <label>Text message</label><br>
        <textarea name="text"> </textarea>
        </p>
        <button type="submit">Send text</button>
    </form>
  </body>
</html>
The above code adds a form with inputs for a phone number and a message, and once the form is submitted, it will send a POST request to /send. Notice the Leaf block starting with #if(status):. It checks for a value for the status variable, and if set, it will add the additional status information. If you build and run (CMD + R), you will now see your updated page.
Create the Model Structs
A benefit of using Vapor is that you can lean on the Swift language's type-safety. You can model inputs and outputs to your server using
that conform to the Codable protocol; Vapor has a protocol called Content for this.
Create a struct called Input that conforms to Content at the bottom of the routes.swift file:
struct Input: Content {
    let to: String
    let text: String
    let from = "SwiftText"
    var apiKey: String?
    var apiSecret: String?

    private enum CodingKeys: String, CodingKey {
        case to
        case text
        case from
        case apiKey = "api_key"
        case apiSecret = "api_secret"
    }
}
The Vonage SMS API expects fields in snake case, so the structs have the CodingKeys enum to map their property names to their snake case equivalent. Below the Input struct, create another struct for the response that the SMS API expects:
struct Response: Content {
    let messages: [Messages]

    struct Messages: Content {
        let status: String
    }
}
Send the SMS
To send the SMS you need to make a call to the /sms endpoint of the Vonage SMS API. To do this, you need to define the /send route used by the web form, parse the form data, and then make the call. Start by defining the new route in the routes function:
app.post("send") { req -> EventLoopFuture<View> in
    var input = try req.content.decode(Input.self)
    input.apiKey = Environment.get("APIKEY")
    input.apiSecret = Environment.get("APISECRET")
}
This uses the form body to create an Input struct, then the API key and secret are added from the .env file as they are required fields by the SMS API. Next, you will use Vapor's Client API, which allows you to make external HTTP calls, to call the SMS API. Add the call to the send route:
app.post("send") { req -> EventLoopFuture<View> in
    var input = try req.content.decode(Input.self)
    input.apiKey = Environment.get("APIKEY")
    input.apiSecret = Environment.get("APISECRET")

    return req.client.post(URI(scheme: "https", host: "rest.nexmo.com", path: "/sms/json")) { req in
        try req.content.encode(input, as: .json)
    }.flatMap { response -> EventLoopFuture<View> in
        let responseBody = try! response.content.decode(Response.self)
        return req.view.render("index", ["status": responseBody.messages.first?.status == "0" ? "ok" : "error"])
    }
}
The client.post function call has a return type of EventLoopFuture<ClientResponse>. It then gets mapped into an EventLoopFuture<View> type, which is the route's expected return type. The map function takes the SMS API response and creates a status variable for the view renderer to use in the index.leaf file.
Try It Out
Build and run (CMD + R) the project, open localhost:8080 in your browser, then fill in a phone number and a message.

Clicking the send button will send the data to the route you defined earlier, make the call to the Vonage SMS API, and then return to the initial page with its status.

What Next?
You can find the completed project on GitHub.
You can do more with the SMS API, such as checking if your server successfully delivered an SMS. Learn about it on our developer platform.
