Connect to the Ethereum Blockchain with Node.js and Vonage

Blockchain is a commonly used term that has many innovations associated with it. The blockchain is, quite literally, a chain of blocks, where each block is a piece of information stored in a public database, the chain. One such blockchain is Ethereum, which takes the concept of a blockchain to a whole new level.
Ethereum is a distributed ledger where users can conveniently agree upon code execution and data updates. The code being executed is a distributed application that contains logic to enable interaction between a user interface and data on the blockchain. A major facilitator for the interactions between the blockchain and a user interface are Events.
Smart contracts emit events from the blockchain which a user interface can listen for to enable specific actions and write event logs (data) to the blockchain. These logs can also be requested by the user interface.
In this tutorial, we'll learn about blockchain events and how these events could be linked with the Vonage Conversation API to build real-world applications.
The code for this article is on GitHub.
Prerequisites
- Basic understanding of the Blockchain
- Basic understanding of JavaScript and Node.js
- Nodejs, Ganache-cli, and Truffle installed on your machine
To complete this tutorial, you will need a
Vonage
API account. If you don’t have one already, you can
sign up
today and start building with free credit. Once you have an account,
you can find your API Key and API Secret at the top of the
Vonage
API Dashboard.Vonage API Account
Create an Application
To get started with the Vongage Conversation API, you first need to create an application. This can be done through your Vonage APIs dashboard by clicking on the "Create a New Application" Button.

During the creation process, public and private keys are generated. The private key is automatically downloaded on your local machine and should be kept safe.
After the application has been created, you'll be given an Application ID and API key to programmatically access the Vonage APIs Application, alongside the private key on our local machine.
Install Dependencies
The final step before we start writing code is to install our Node.js dependencies with NPM:
npm init -y
npm install web3 nexmo@beta dotenv
npm install nodemon --save-dev
Next, set up a few NPM scripts to help run the application:
"scripts": {
    "start": "node nexmo.js",
    "develop": "nodemon nexmo.js"
}
Set Up and Compile Solidity Contract
Solidity is a high-level programming language used to create smart contracts on the Ethereum Blockchain. In this tutorial, we'll set up a smart contract to emit events from the Ethereum Blockchain once a message has been sent.
contract TextMessage {
    // define event
    event NewText(address sender, string content);
    function sendMessage(address _sender, string memory _content) public {
        // emit event
        emit NewText(_sender, _content);
    }
}
Next, we'll compile this smart contract into a form that can be easily used by our Node.js application. This compilation is done using Truffle.
truffle compile
Once the compilation is done, a JSON file that describes the smart contract is generated in a build/contracts folder within the current directory.
Setup Node.js Application
To ensure the smooth execution of our application, we need a few environment variables set up in our application. These enable us to easily use the Vongage Conversation API to interact with our Ethereum node.
const dotenv = require('dotenv');
const fs = require('fs');
const path = require('path');
dotenv.config();

const pkey = fs.readFileSync(path.join(__dirname, 'private.key'), 'utf8');

module.exports = {
    NEXMO_PRIVATE_KEY: pkey,
    NEXMO_APPLICATION_ID: process.env.NEXMO_APPLICATION_ID,
    NEXMO_API_KEY: process.env.NEXMO_API_KEY,
    NEXMO_APP_SECRET: process.env.APP_SECRET
    };
The Nexmo Application ID, API key, and APP Secret can be found on the application's dashboard and should be stored in a .env file within the current directory. These constants are initialized with our Vonage SDK instance.
const { NEXMO_API_KEY, NEXMO_APPLICATION_ID, NEXMO_APP_SECRET, NEXMO_PRIVATE_KEY } = require('./config');

const nexmo = new Nexmo({
    apiKey: NEXMO_API_KEY,
    apiSecret: NEXMO_APP_SECRET,
    applicationId: NEXMO_APPLICATION_ID,
    privateKey: NEXMO_PRIVATE_KEY
});
The Vonage Conversation API provides a host of APIs to enables real-time communication over several channels (voice, text, video). Interactions via these channels can be initiated by creating a Conversation.
nexmo.conversations.create({
    "name": CONV_NAME,
    "display_name": CONV_DISPLAY_NAME}, (error, result) => {
        if(error) {
            console.error(error);
        }
        else {
            console.log(result);
        }
    });
The conversation ID returned is used for emitting and listening for events that occur in this conversation.
Users are then created to interact in this conversation via membership. We also take note of the resulting Member ID.
nexmo.conversations.members.create(CONVERSATION_ID,
        {"action":"join", "user_id":USER_ID, "channel":{"type":"app"}},
        (error, result) => {
        if(error) {
            console.error(error);
         }
        else {
            console.log(result);
        }
    });
Connect to the Ethereum Blockchain
To interact with our local Ethereum Node (a program which connects to the Ethereum network, provided by Ganache-cli in this case for testing purposes) through Node.js, we use Web3, a set of libraries which provides APIs for JavaScript and Node.js applications to connect to an Ethereum Node.
const Web3 = require('web3');

const provider = new Web3.providers.WebsocketProvider('ws://localhost:8545');
let web3 = new Web3(provider);
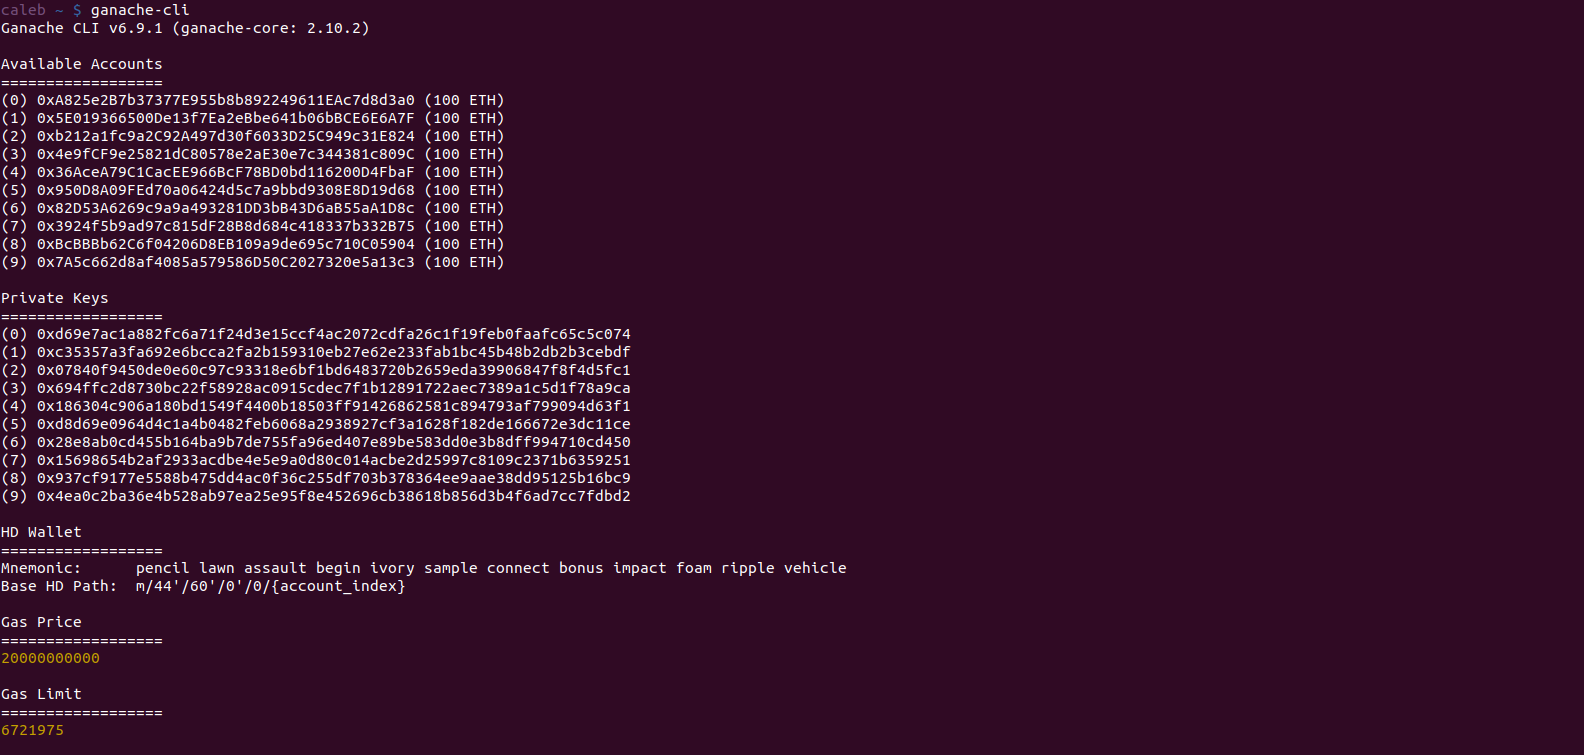
Here, we use a WebSocket provider that connects our Node.js application to the Ganache-cli RPC client. The Ganache-cli needs to be started after installation with the command:
ganache-cli
Next, we pass information about the smart contract to our Node.js application and instantiate the contract. The Contract information is found in the ABI (Application Binary Interface) contained in the JSON file autogenerated from compiling our smart contract.
let senderAccount = '0xA825e2B7b37377E955b8b892249611EAc7d8d3a0';

const contractJSON = JSON.parse(fs.readFileSync('../build/contracts/TextMessage.json'), 'utf8');

const abi = contractJSON.abi;

const contract = new web3.eth.Contract(abi, senderAccount);
You may notice in the code snippet above, we need an account from which transactions would be sent. Ganache-cli provides a couple of test accounts and their associated private keys which are used throughout the development process.

Send a Message to the Network
Next, we send a message to the Ethereum Node and create a Conversation event once the transaction hash becomes available. The Conversation event contains the data (message sent) from the transaction.
let receiverAccount = '0x7A5c662d8af4085a579586D50C2027320e5a13c3';

contract.methods.sendMessage(senderAccount, receiverAccount, message).send({
    from: senderAccount,
    // gas: 8500000,         // Gas sent with each transaction
    gasPrice: 20000000000,  // 20 gwei (in wei)
}).on('transactionHash', function (hash) {
    console.log('hash: ', hash);

    //send conversation event to create text
    nexmo.conversations.events.create(NEXMO_CONVERSATION_ID, {
        "type": "text",
        "from": NEXMO_MEMBER_ID,
        "body": {
            "text": message
        }
    }, (error, res) => {
        if (error) {
            console.error(error);
        } else {
            console.log('new text on the blockchain: ', res);
        }
    });
});
Listen for Blockchain Events
We could also listen to the NewText event emitted from the Blockchain. Once this event is successful, we could emit a custom Conversation event which could be used by a user interface to listen for messages from the blockchain.
contract.events.NewText(function (error, event) {
    if (error) {
        return error;
    }
}).on('data', function (data) {
    nexmo.conversations.events.create(NEXMO_CONVERSATION_ID, {
        "type": "text:delivered",
        "from": NEXMO_MEMBER_ID,
        "body": {
            "text": data
        }
    }, (error, result) => {
        if (error) {
          return error;
        } else {
          return event;
        }
    });
})
Put Everything Together
It's now time to test our application! First, we ensure Ganache-cli is running in the terminal and our smart contract has been compiled with Truffle. Once these have been done, we run npm start in a new terminal instance to run our application.
A look at our Ganache-cli logs in the terminal should show the eth_sendTransaction and eth_subscribe APIs being called on our Ethereum Node, which indicates the start of a transaction and a subscription to an event by our Node.js application

What's Next?
We could build on this application by building out a fully-fledged chat application on the Blockchain, including more robust error handling, indexing messages on the blockchain, and much more!
