
Real-Time Face Detection in .NET with OpenCV and Vonage Video API
Computer Vision is my favorite field in computer science. It combines my four favorite subjects—Programming, Linear Algebra, Probabilities, and Calculus—into something practical and powerful. In this article, we're going to look at one cool application of Computer Vision, face detection, and integrate this feature into an OpenTok Windows Presentation Framework(WPF) App.
Baseline
To help us get started, we'll be working off of the CustomVideoRender Vonage Video sample. Right now this sample adds a shade of blue to your video frame when you toggle the filter on. We are going to remove that blue shading and add face detection to the renderer instead. And if you believe it, that facial detection feature is going to be about 30 times faster than the blue filter. To accomplish this feat we are going to apply the Viola-Jones method for feature detection using Emgu CV.
Just Give Me the Code
If you don't feel like running through this whole tutorial you can find a working sample in GitHub. Just make sure you swap out the parameters as instructed in the Quickstart Guide from the main samples repo
A Brief Overview of Viola-Jones
I won't dive too deeply into how the Viola-Jones method works, but for those interested, here's some brief context. The crux of the Viola-Jones algorithm is three-fold. First, it uses something called Haar-like features, which might look like silly black and white shapes.
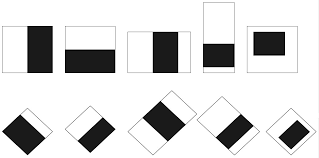
But in reality, they are actually detectors for very simple features that can tell us a lot about the relative shading of an image:
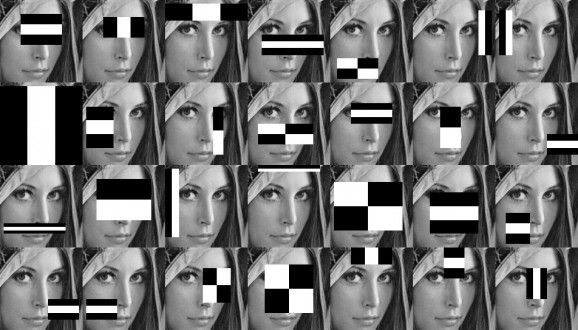
When overlaid onto an image the sum of the white region is subtracted from the sum of the black region, effectively telling us the shading difference between the regions. Those calculations, when cascaded over many features, can give us a good idea of where in an image a face might be. As these features are so simple, they are scale-invariant meaning they can find faces in an image regardless of how big or small.
This method does an excellent job detecting faces in an image, but if not for the paper's last major innovation, this method would be cripplingly slow, rather than lighting fast. They introduced the concept of an integral image—an integral image is an image where each pixel is set to the sum of the region above and to the left of the pixel. By computing this on an input image we are able to perform calculations on Haar-like features with a time complexity of O(1) rather than O(N*M) where N & M are the height and width respectively of the Haar-like feature. This makes the combinatorics not only work but work well in our favor as we're trying to build a face detector that operates rapidly.
Prerequisites
- Visual Studio - I'm using 2019, though older versions ought to work
- Minimum .NET Framework 4.6.1 - you can use as far back as 4.5.2, but you'll have to use EmguCV instead of Emgu.CV for your OpenCV NuGet package.
- CustomVideoRenderer Sample - this is the sample we will be adapting.
- A Vonage Video API account - if you don't have one sign up here.
- An API Key, Session ID, and Token from your Vonage Video API account - see the Quickstart guide in the repo for details.
Getting Started
Upgrade to 4.6.1
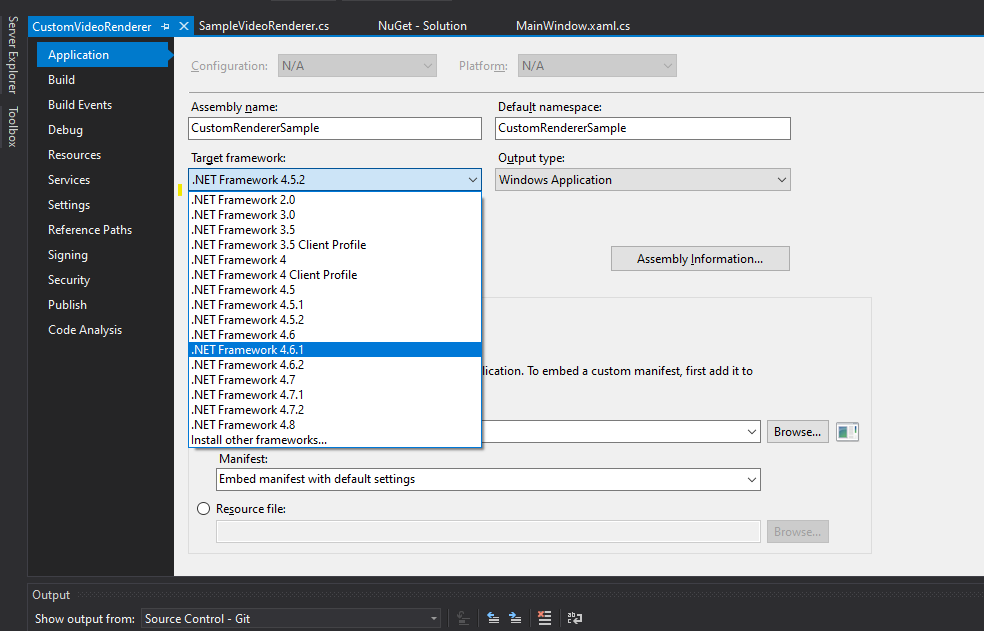
First, let's open up the CustomVideoRenderer solution file. In MainWindow.xaml.cs put your credentials in if you haven't already. Then upgrade the csproj to target the .NET Framework 4.6.1.
To do this open the solution in Visual Studio, right-click on the project file, and click 'properties'. Then in the Application tab change the target framework to 4.6.1.
Add NuGet Packages
Next, add the following NuGet packages on top of what's already in the app:
- Emgu.CV.runtime.windows - I'm using 4.2.0.3662
- WriteableBitmapEx - I'm using 1.6.5
Grab the Haar-like Features
Grab the following two files from OpenCV:
- haarcascade_frontalface_default.xml
- haarcascade_profileface.xml
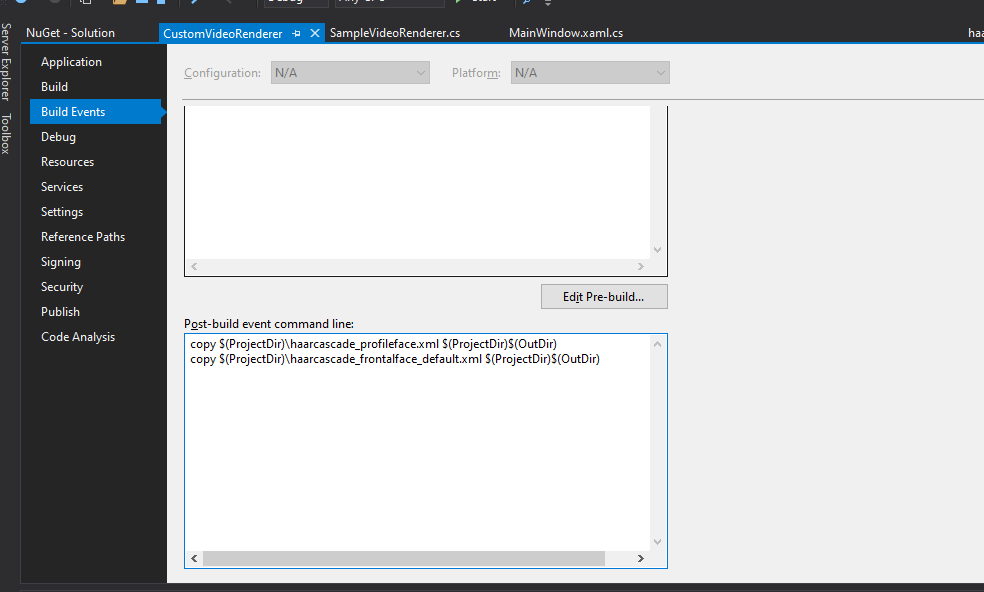
Put these files alongside your project and set them to be copied down to your build directory when it's built. This may involve setting a post-build event if your Visual Studio instance is as uncooperative as mine:
copy $(ProjectDir)\haarcascade_profileface.xml $(ProjectDir)$(OutDir)
copy $(ProjectDir)\haarcascade_frontalface_default.xml $(ProjectDir)$(OutDir)
At this point, you should be able to fire the app up and connect to a call. Since Windows stops you from having your camera accessed by more than one application at the same time you may need to join the call from another computer using the Vonage Video API Playground

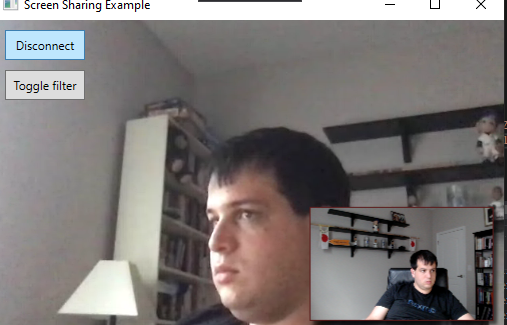
Now if we connect our call it should look something like this in the Windows App:
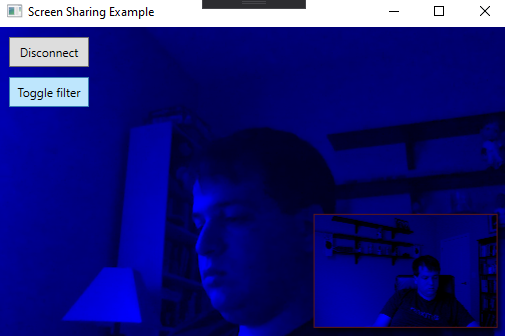
And if we toggle the filter button on it'll look more like:
What's Happening So Far
So far all that's happening is if you click the 'toggle filter' button the app will apply a tint of blue to every frame that comes into the renderer.
How Does This Happen
Rather than using the standard VideoRenderer, we are creating our own custom renderer, SampleVideoRenderer, which extends Control and implements Vonage Video API's IVideoRenderer. That interface is fairly simple: it has one method, RenderFrame, which we are taking the frame from and drawing onto a bitmap in the control. This allows us to intervene whenever a frame appears, apply what we want to it, and have it render.
Adding Computer Vision
So with this Custom Renderer, we have all we need to get started with adding the CV to our app. Let's open SampleVideoRenderer.cs and before we do anything else add the following imports:
using Emgu.CV;
using Emgu.CV.Structure;
using System.Diagnostics;
using System.Drawing;
using System.Collections.Concurrent;
using System.IO;
using System.Threading;
While you're here, rename EnableBlueFilter to DetectingFaces (make sure you use your IDE's rename feature) and make it a public get, private set property rather than a public field like so:
public bool DetectingFaces { get; private set; }
This will break some things, but it should become apparent soon how to fix them. For now, we're going to press onwards.
Constants
Add the following constants to your Renderer:
private const double SCALE_FACTOR = 4;
private const int INTERVAL = 33;
private const double PIXEL_POINT_CONVERSION = (72.0 / 96.0);
The SCALE_FACTOR is the scale we are going to scale the images down to for processing—4 means we will be resizing the images to a quarter of the size before running detection. The INTERVAL is the number of milliseconds between images we'll attempt to capture from the stream. 33 is approximately the number of milliseconds between frames in a 30FPS stream, so the parameter as-is means it is running at full speed. The PIXEL_POINT_CONVERSION is the ratio of pixels per point on a 96 DPI screen (which is what I'm using). Naturally, this can be better calculated when we're factoring for DPI awareness, but we are going to use that ratio as gospel for now. We only need this because for whatever reason the Bitmap Extensions library we're using seems to like to draw X in points and Y in pixels 🤷♂️.
Create Our Classifiers
I briefly discussed how Haar-like features worked earlier, but for a more in-depth look at them feel free to check out the Viola-Jones paper. The great thing about OpenCV (and EmguCV by extension) is just how much of this is abstracted away from us.
Now continuing on with our SampleVideoRenderer. Go down and add two static CascadeClassifiers as fields:
static CascadeClassifier _faceClassifier;
static CascadeClassifier _profileClassifier;
Then in the constructor initialize them with their respective files:
_faceClassifier = new CascadeClassifier(@"haarcascade_frontalface_default.xml");
_profileClassifier = new CascadeClassifier(@"haarcascade_profileface.xml");
These XML files describe the Haar's Features to the classifier well enough to train it. So at this point, we have trained the classifier!
Now Lets Classify
Some Necessary Structures
While we are classifying, we are not going to want to block the main thread. So we are going to be implementing the producer-consumer pattern. We're going to use BlockingCollections. Specifically, we're going to be using a ConcurrentStack, because the most relevant and most recent frames are one and the same. Add the following fields to our class:
private System.Drawing.Rectangle[] _faces = new System.Drawing.Rectangle[0];
private BlockingCollection<Image<Bgr, byte>> _images = new BlockingCollection<Image<Bgr, byte>>(new ConcurrentStack<Image<Bgr, byte>>());
private CancellationTokenSource _source;
private Stopwatch _watch = Stopwatch.StartNew();
The _faces array is going to contain the faces we've detected with our classifier, whereas the _images collection, initialized with a ConcurrentStack, is going to be the LIFO collection of images we are going to be processing. The CancellationTokenSource is what we are going to use to pull ourselves out of the processing loop when the time comes. The Stopwatch is going to serve as our timekeeper gating us from trying to detect on frames too rapidly.
Processing Loop
Now let's implement our processing loop. Add the following method to your code:
private void DetectFaces(CancellationToken token)
{
    System.Threading.ThreadPool.QueueUserWorkItem(delegate
    {
        try
        {
            while (true)
            {
                var image = _images.Take(token);
                _faces = _faceClassifier.DetectMultiScale(image);
                if(_faces.Length == 0)
                {
                    _faces = _profileClassifier.DetectMultiScale(image);
                }
                if (_images.Count > 25)
                {
                    _images = new BlockingCollection<Image<Bgr, byte>>(new ConcurrentStack<Image<Bgr, byte>>());
                    GC.Collect();
                }
            }
        }
        catch (OperationCanceledException)
        {
            //exit gracefully
        }
    }, null);
}
A lot is going on in this method. First, we are going to run the operation on one of the ThreadPool's available Daemons. Then, we're going to process in a tight loop. We call Take on the blocking collection to pull an image off the stack. This Take call will block if there is nothing in the collection, and when we signal the cancel it will throw an OperationCanceledException, which we catch below, breaking us out of the loop gracefully. With the image, it will assign the _faces collection to the result of DetectMultiScale, which is the face detection method. If that doesn't find anything will try again with the profile face classifier.
When all this is done we check the images collection to see if it's over some limit (we're just using 25 as an example here). If it exceeded that, because the classifier has fallen behind, we are going to clear out the collection by re-instantiating it, and then we are going to tell the Garbage Collector to come through and collect those images. Why call the garbage collector? Well, that's the topic of a different blog post, but essentially if your objects are too large (above 85,000 bytes), it's pushed off onto the Large Object Heap, which is assigned a lower priority by the garbage collector than other objects (since it's fairly computationally expensive to release the memory). What this means in practice is if you are dealing with large objects relatively rapidly you may want to make sure they're cleaned up or you'll get a hefty memory usage.
Now if you follow my performance guidelines below, you'll never need to hit that code, but I'm leaving it in just so when folks are tuning they don't see massive spikes in memory usage.
Toggling the Detection Loop
Now add the following code to your Renderer:
public void ToggleFaceDetection(bool detectFaces)
{
    DetectingFaces = detectFaces;
    if (!detectFaces)
    {
        _source?.Cancel();
    }
    else
    {
        _source?.Dispose();
        _source = new CancellationTokenSource();
        var token = _source.Token;
        DetectFaces(token);
    }
}
This is going to manage the toggling of the face detector for your renderer. If you're setting it to stop, it will tell the token source to cancel, breaking you out of the loop gracefully. If you are telling it to start, it will dispose of the old CancellationTokenSource, reinitialize it, grab a token, and start the processing loop with that token.
Let's also add a finalizer to make sure the face detection task is canceled when the renderer is winding down:
~SampleVideoRenderer()
{
    _source?.Cancel();
}
Putting It All Together
Up to now, we've laid all the groundwork that we are going to need to do the face detection. From here it's just a matter of getting our renderer to perform facial detection on each frame. Now go into the RenderFrame method in the SampleVideoRenderer. Delete the two nested for loops and replace that code with:
using (var image = new Image<Bgr, byte>(frame.Width, frame.Height, stride[0], buffer[0]))
{
    if (_watch.ElapsedMilliseconds > INTERVAL)
    {
        var reduced = image.Resize(1.0 / SCALE_FACTOR, Emgu.CV.CvEnum.Inter.Linear);
        _watch.Restart();
        _images.Add(reduced);
    }
}
DrawRectanglesOnBitmap(VideoBitmap,_faces);
This is going to pull the image directly from the buffer our previous filter was copying too, then push the new image onto our blocking stack, and then it will draw the rectangles on the faces detected. Below the RenderFrame method add the DrawRectanglesOnBitmap method which will look like:
public static void DrawRectanglesOnBitmap(WriteableBitmap bitmap, Rectangle[] rectangles)
{
    foreach (var rect in rectangles)
    {
        var x1 = (int)((rect.X * (int)SCALE_FACTOR) * PIXEL_POINT_CONVERSION);
        var x2 = (int)(x1 + (((int)SCALE_FACTOR * rect.Width) * PIXEL_POINT_CONVERSION));
        var y1 = rect.Y * (int)SCALE_FACTOR;
        var y2 = y1 + ((int)SCALE_FACTOR * rect.Height);
        bitmap.DrawLineAa(x1, y1, x2, y1, strokeThickness: 5, color: Colors.Blue);
        bitmap.DrawLineAa(x1, y1, x1, y2, strokeThickness: 5, color: Colors.Blue);
        bitmap.DrawLineAa(x1, y2, x2, y2, strokeThickness: 5, color: Colors.Blue);
        bitmap.DrawLineAa(x2, y1, x2, y2, strokeThickness: 5, color: Colors.Blue);
    }
}
That will draw the rectangle as 4 separate lines onto the bitmap and display it—note how we are using the PIXEL_POINT_CONVERSION on the x only.
One Last Thing Before We Test
I noticed the PublisherVideo element in the MainWindow is a bit small for me to make out what's going on in it. So for my testing purposes, I doubled or quadrupled the size of the window. To do that just adjust the Height and Width on line 12 of MainWindow.xaml.
Ready, Set, Test
Now we're ready—fire up the app and hit the Toggle Filter button on the upper left-hand corner of the screen. That will activate the filter. You should see it on your preview, and if you connect to a call you'll be able to see it the facial detection working on the remote participants as well.
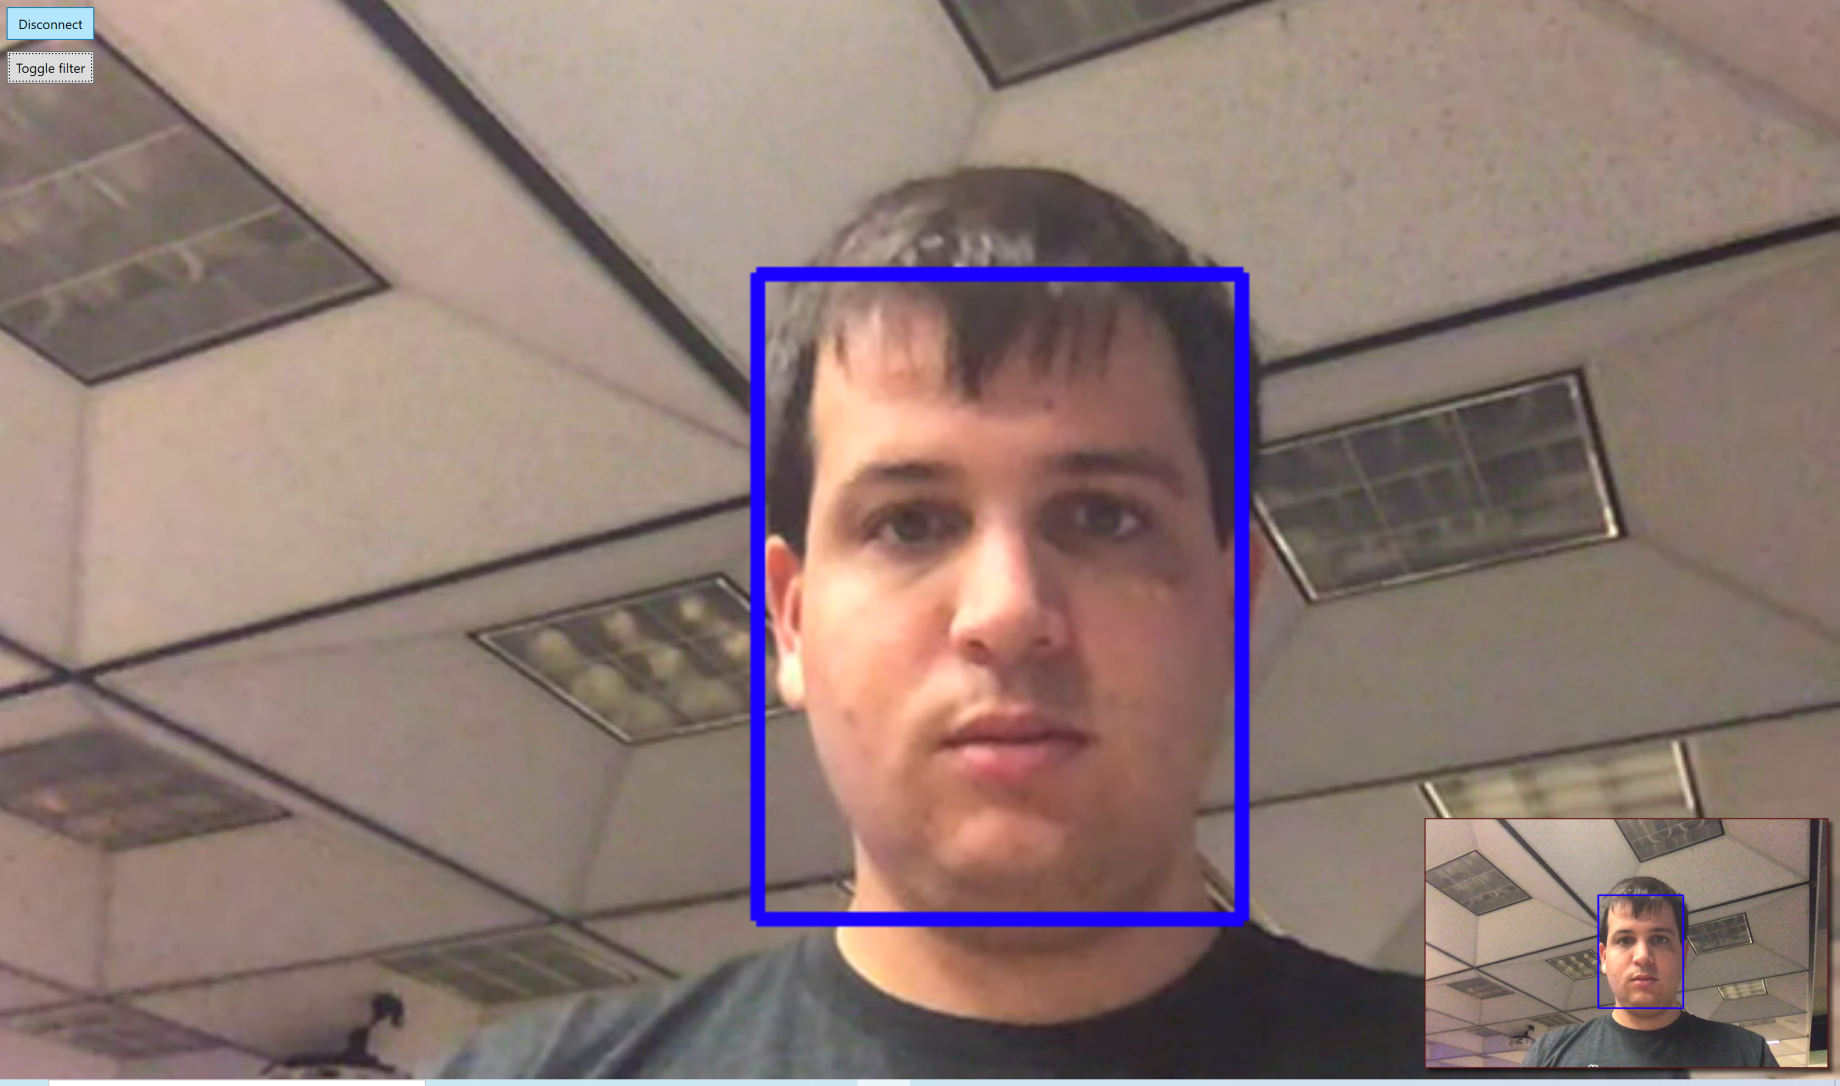
You'll see this means of feature detection is both accurate and quick. The filter runs in about 10ms, compared to the ~30ms for the blue filter that was modified. And since the main processing runs on a worker thread, and the actual drawing takes less than a millisecond, this is actually about thirty times faster, meaning adding facial detection is virtually free from a UX perspective.
Parameter Tuning
No Computer Vision discussion would be complete without a little blurb about parametric tuning. There are all sorts of parameters you could potentially tune here, but I'm only going to focus on two:
- Interval between frames
- Scale Factor
As mentioned earlier, the 33 milliseconds between frames worked for me especially if I set the scale factor appropriately. The scale factor was the most important piece for performance. If you set the scale factor to 1—in other words, try to take a full image (in my case 1280x720)—that's 921,000 pixels to process every 33 milliseconds, which has a substantial performance cost. On my machine, it would run at about 200ms per frame, redline my CPU, and without adding the explicit call to the garbage collector, would cause the memory usage to explode. Remember the scale factor is quadratic, so setting the scale factor to 4 results in the number of pixels decreasing by a factor of 16. From my testing, I did not see any drop-off in accuracy when resizing.
Pushing Further
We are going to leave this here for now, but I'm hoping this post inspires the reader to recognize the immense potential that OpenCV has in .NET. Some neat applications you could use this for, off the top of my head:
- Adding filters and integrating AR into your apps. Check out some articles on Homographies and feature tracking algorithms. I personally like ORB (if for no other reason than it's much freer than other feature tracking algorithms!).
- You could integrate Far End Camera Control (FECC) into your app and have the camera motions set to track your face!
- Once you've found the face ROI in your image you can much more efficiently run things like sentiment analysis.
- As one might imagine, it's the first step of facial recognition.
Resources
- You can find a working sample from this tutorial in GitHub here
- For anything you could ever want to know about Vonage Video API check out our site
- For anything you could ever want to know about OpenCV Check out their docs
- Check out Emgu's wiki page to learn more about using Emgu in particular. If you're an OpenCv Python fan like I am, you'll have no problem using Emgu